如何在 Selenium 中拖放(示例)
Selenium 中的拖放功能
一些网络应用程序具有拖动网页元素并将其放置在指定区域或元素上的功能。我们可以使用 Selenium Webdriver 自动化此类元素的拖放操作。
拖放语法
Actions 类有两个支持拖放的方法。让我们来学习它们——
Actions.dragAndDrop(Sourcelocator, Destinationlocator)
如何在 Selenium 中进行拖放
以下是如何使用 Selenium Webdriver 拖放元素
在 dragAndDrop 方法中,我们传递两个参数 –
- 第一个参数“Sourcelocator”是我们需拖动的元素
- 第二个参数“Destinationlocator”是我们需将第一个元素放置在其上的元素
Actions.dragAndDropBy(Sourcelocator, x-axis pixel of Destinationlocator, y-axis pixel of Destinationlocator)
dragAndDropBy 方法我们传递 3 个参数 –
- 第一个参数“Sourcelocator”是我们需拖动的元素
- 第二个参数是我们需要将第一个元素拖放到其上的第二个元素的 x 轴像素值。
- 第三个参数是我们需要将第一个元素拖放到其上的第二个元素的 y 轴像素值。

让我们通过以下 3 个场景实际向您展示使用 Selenium Webdriver 拖放元素的操作
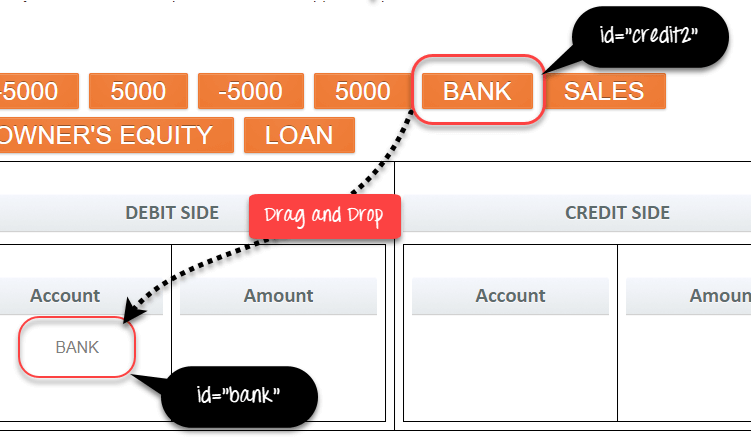
场景 1:通过 DragAndDrop 方法将 BANK 元素拖动并放置到特定单元格中。
在以下代码中,我们在 Firefox 浏览器中启动给定的 URL,然后通过 dragAndDrop 方法将 BANK 元素拖动并放置到 DEBIT SIDE 块上。
import org.openqa.selenium.By;
import org.openqa.selenium.WebDriver;
import org.openqa.selenium.WebElement;
import org.openqa.selenium.chrome.ChromeDriver;
import org.openqa.selenium.interactions.Actions;
import org.testng.annotations.Test;

public class DragAndDrop {

    WebDriver driver;

    @Test
    public void DragnDrop()
    {
         System.setProperty("webdriver.chrome.driver"," E://Selenium//Selenium_Jars//chromedriver.exe ");
         driver= new ChromeDriver();
         driver.get("https://demo.guru99.com/test/drag_drop.html");

		//Element which needs to drag.
        	WebElement From=driver.findElement(By.xpath("//*[@id='credit2']/a"));

         //Element on which need to drop.
         WebElement To=driver.findElement(By.xpath("//*[@id='bank']/li"));

         //Using Action class for drag and drop.
         Actions act=new Actions(driver);

	//Dragged and dropped.
         act.dragAndDrop(From, To).build().perform();
	}
}
代码解释:在上述代码中,我们在 Firefox 浏览器中启动给定的 URL,然后通过 dragAndDrop 方法将 BANK 元素拖动并放置到 DEBIT SIDE 块上。下面简要解释
首先,我们将需要拖动的第一个元素捕获到变量“From”中。
WebElement From=driver.findElement(By.xpath("//*[@id='credit2']/a"));
其次,我们将需要将第一个元素放置在其中的第二个元素捕获到变量“To”中。
WebElement To=driver.findElement(By.xpath("//*[@id='bank']/li"));
第三,我们创建 Actions 类的对象,因为我们使用 Actions 类的方法。
Actions act=new Actions(driver);
对于拖放元素,我们使用 Actions 类的 dragAndDrop 方法,并传入第一个元素 (Sourcelocator) “From”和第二个元素 (Destinationlocator) “To”作为参数。以下行将拖动第一个元素并将其放置到第二个元素上。
act.dragAndDrop(From, To).build().perform();
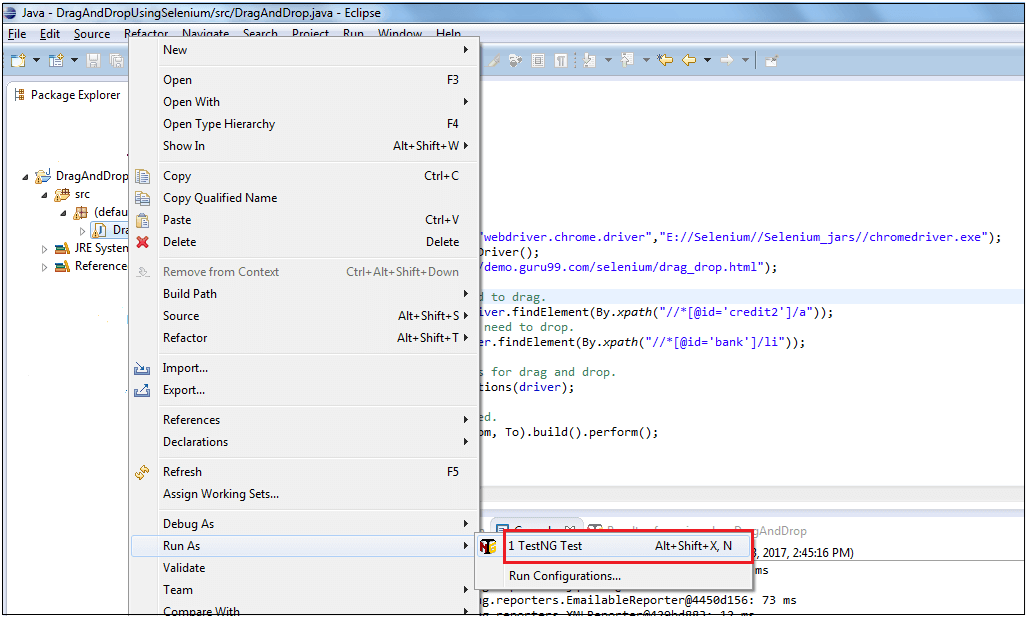
脚本执行。
现在,您可以像下面截图所示,从 eclipse 中逐一执行上述脚本。
以下是运行脚本时的输出
场景 2:通过 DragAndDropBy 方法将 BANK 元素拖动并放置到特定单元格中。
在此场景中,我们在浏览器中启动给定 URL,然后通过 dragAndDropBy 方法将 BANK 元素拖放到 DEBIT SIDE 块上。要使用 dragAndDropBy,我们需要找到元素的像素。
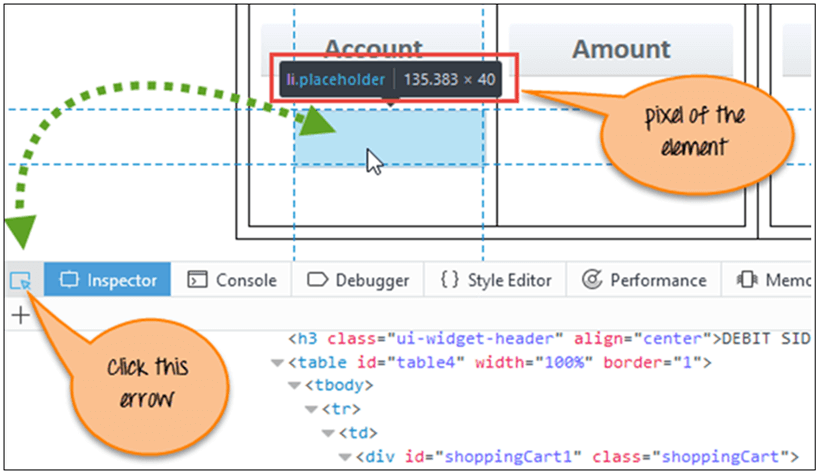
如何找到像素?
在 Chrome 或 FireFox 中打开 URL,然后点击蓝色箭头。
接下来点击您想知道像素的任何元素。
您会在元素上方找到像素,如下图所示。
import org.openqa.selenium.By;
import org.openqa.selenium.WebDriver;
import org.openqa.selenium.WebElement;
import org.openqa.selenium.chrome.ChromeDriver;
import org.openqa.selenium.interactions.Actions;
import org.testng.annotations.Test;


public class DragAndDrop {

    WebDriver driver;
    @Test
    public void DragnDrop()
    {
         System.setProperty("webdriver.chrome.driver","E://Selenium//Selenium_Jars//chromedriver.exe");
         driver= new ChromeDriver();
         driver.get("https://demo.guru99.com/test/drag_drop.html");

	//Element(BANK) which need to drag.
        WebElement From=driver.findElement(By.xpath("//*[@id='credit2']/a"));

        //Using Action class for drag and drop.
        Actions act=new Actions(driver);

        //Drag and Drop by Offset.
        act.dragAndDropBy(From,135, 40).build().perform();
 }
}
注意:像素值会随着屏幕分辨率和浏览器大小而变化。因此,此方法不可靠且不常使用。
场景 3:拖放几个元素,然后验证消息是否显示。
在以下代码中,我们在浏览器中启动给定 URL,然后拖动 BANK、SALES、500 等元素并将其放置到相应的块中。完成后,我们验证输出消息。
import org.openqa.selenium.By;
import org.openqa.selenium.WebDriver;
import org.openqa.selenium.WebElement;
import org.openqa.selenium.chrome.ChromeDriver;
import org.openqa.selenium.interactions.Actions;
import org.testng.annotations.Test;

public class DragAndDrop {

    WebDriver driver;
    @Test
    public void DragnDrop()
    {
    	 System.setProperty("webdriver.chrome.driver"," E://Selenium//Selenium_Jars//chromedriver.exe");
         driver= new ChromeDriver();
         driver.get("https://demo.guru99.com/test/drag_drop.html");

	//Element(BANK) which need to drag.
     	 WebElement From1=driver.findElement(By.xpath("//*[@id='credit2']/a"));

     	//Element(DEBIT SIDE) on which need to drop.
     	WebElement To1=driver.findElement(By.xpath("//*[@id='bank']/li"));

	//Element(SALES) which need to drag.
     	WebElement From2=driver.findElement(By.xpath("//*[@id='credit1']/a"));

	//Element(CREDIT SIDE) on which need to drop.
     	WebElement To2=driver.findElement(By.xpath("//*[@id='loan']/li"));

     	//Element(500) which need to drag.
        WebElement From3=driver.findElement(By.xpath("//*[@id='fourth']/a"));

        //Element(DEBIT SIDE) on which need to drop.
     	WebElement To3=driver.findElement(By.xpath("//*[@id='amt7']/li"));

	//Element(500) which need to drag.
        WebElement From4=driver.findElement(By.xpath("//*[@id='fourth']/a"));

        //Element(CREDIT SIDE) on which need to drop.
     	WebElement To4=driver.findElement(By.xpath("//*[@id='amt8']/li"));

	//Using Action class for drag and drop.
     	Actions act=new Actions(driver);

	//BANK drag and drop.
     	act.dragAndDrop(From1, To1).build().perform();

	//SALES drag and drop.
     	act.dragAndDrop(From2, To2).build().perform();

	//500 drag and drop debit side.
     	act.dragAndDrop(From3, To3).build().perform();

	//500 drag and drop credit side.
     	act.dragAndDrop(From4, To4).build().perform();

	//Verifying the Perfect! message.
	if(driver.findElement(By.xpath("//a[contains(text(),'Perfect')]")).isDisplayed())
     	{
         	System.out.println("Perfect Displayed !!!");
     	}
		else
     	{
        	System.out.println("Perfect not Displayed !!!");
     	}
}
输出分析
在输出中,您可以看到元素被拖动并放置在定义的元素上。您可以查看输出的 GIF。
摘要
- 在上述教程中,我们通过 WebDriver 中的 Action 方法演示了 Web 应用程序的拖放功能
- dragAndDrop(源定位器, 目标定位器)
- dragAndDropBy(源定位器, 目标定位器的 x 轴像素, 目标定位器的 y 轴像素)
- 为了拖放元素,我们首先使用了 Actions 类中的 DragAndDrop 方法,其中我们传递了 2 个参数,第一个参数是我们需拖动的元素,第二个参数是我们需将第一个元素放置在其中的元素。
- 其次,我们使用了 Actions 类中的 dragAndDropBy 方法,其中我们传递了 3 个参数,第一个参数是我们需拖动的元素,第二个参数是第二个元素的 x 轴像素值,第三个参数是第二个元素的 y 轴像素值。