Selenium 与 Cucumber(BDD 框架教程)
在本教程中,您将学习如何将 Cucumber 与 Selenium Webdriver 集成。
什么是 Cucumber?
Cucumber 是一种支持行为驱动开发 (BDD) 的测试方法。它使用 Gherkin 语言以简单的英语文本解释应用程序的行为。
了解更多信息请访问 – https://guru99.com.cn/cucumber-tutorials.html
什么是 Selenium?
Selenium 是一种用于基于 Web 应用程序的功能测试的自动化工具。Selenium 支持不同的语言,如 Java、Ruby、Python C# 等。
了解更多信息请访问 – https://guru99.com.cn/selenium-tutorial.html
为什么要将 Cucumber 与 Selenium 结合使用?
Cucumber 和 Selenium 是两种流行的技术。
大多数组织使用 Selenium 进行功能测试。这些使用 Selenium 的组织希望将 Selenium 与 Cucumber 集成,因为 Cucumber 使其易于阅读和理解应用程序流程。
Cucumber 工具基于行为驱动开发框架,该框架充当以下人员之间的桥梁
- 软件工程师和业务分析师。
- 手动测试员和自动化测试员。
- 手动测试员和开发人员。
Cucumber BDD 框架还有利于客户理解应用程序代码,因为它使用 Gherkin 语言,该语言是纯文本。组织中的任何人都可以理解软件的行为。Gherkin 的语法是简单的文本,易于阅读和理解。

将 Cucumber 与 Selenium 结合使用的先决条件
在开始 Cucumber Selenium 集成之前,我们需要以下项目
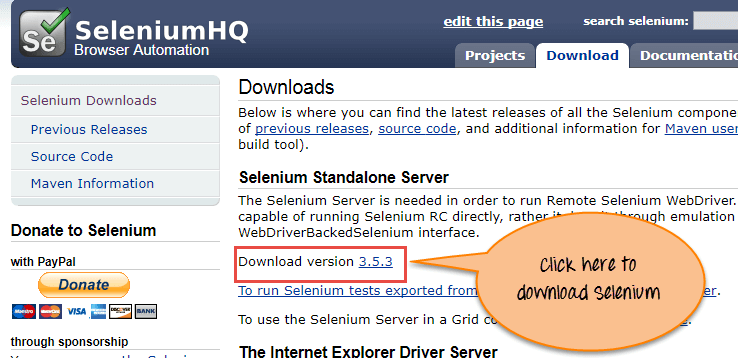
- Selenium Jar 文件
- Selenium-server-standalone
可从 http://www.seleniumhq.org/download/ 下载
Cucumber 的 Jar 文件
- Cucumber-core
- Cucumber-html
- Cobertura 代码覆盖率
- Cucumber-java
- Cucumber-junit
- Cucumber-jvm-deps
- Cucumber-reporting
- Hamcrest-core
- Gherkin
- Junit
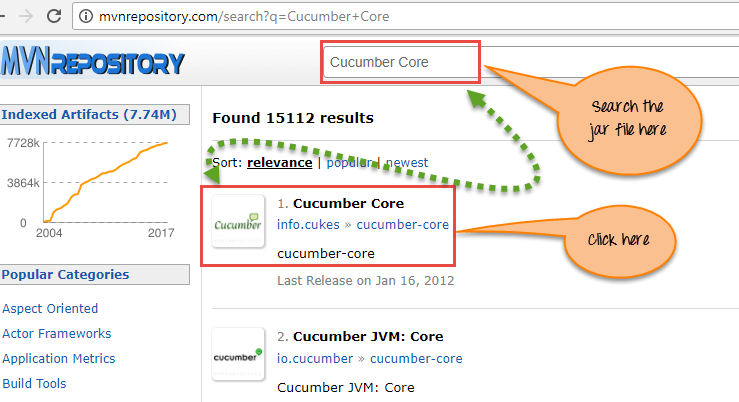
可从 https://mvnrepository.com/search?q=Cucumber 下载
您需要逐个搜索并下载文件。
例如,我们将向您展示如何下载其中一个 jar 文件,即“Cucumber-core”。
单击上面的下载链接。它将重定向到以下站点。现在搜索特定的 jar,即“Cucumber Core”,如以下屏幕截图所示
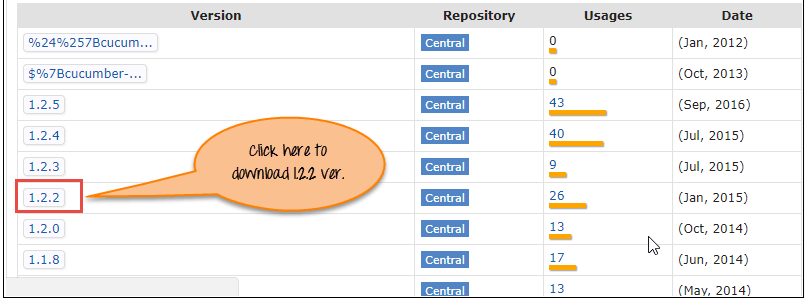
在下一页中,单击版本 1.2.2,
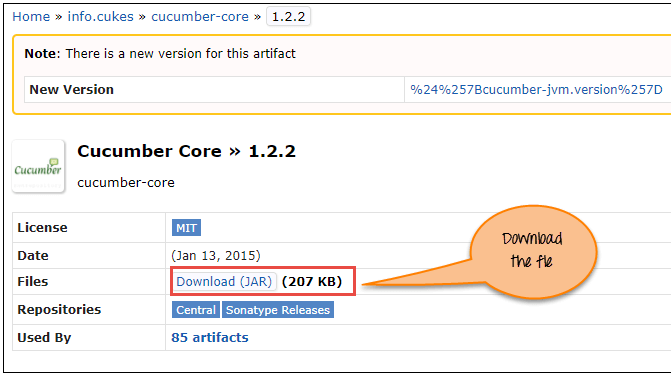
在下一个屏幕中,单击下载以获取“Cucumber Core”jar 文件。
注意:为了您的方便,我们已经将需要从 Maven 这里下载的 jar 文件打包在一起。随着时间的推移,这些 jar 可能会更新并变得不兼容。请使用上面说明的方法下载它们。
使用 Cucumber 和 Selenium 进行自动化测试。
让我们一步步学习如何使用 Cucumber 和 Selenium。这里我们将涵盖 3 种场景
- 场景 1:在控制台中打印文本。
- 场景 2:输入登录凭据并重置值。
- 场景 3:在 Guru99 上输入登录凭据并重置值。对 3 组数据执行此操作。
场景 1:在控制台中打印文本。
在此场景中,我们只使用 Cucumber 在控制台中打印文本。
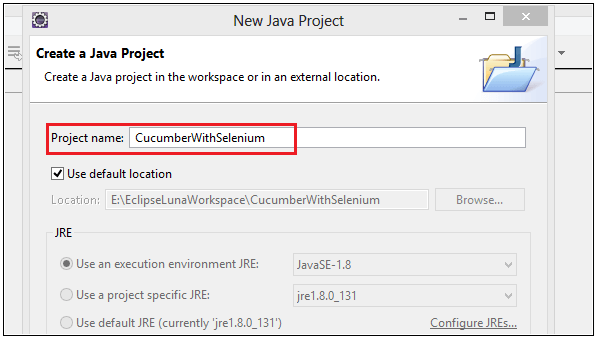
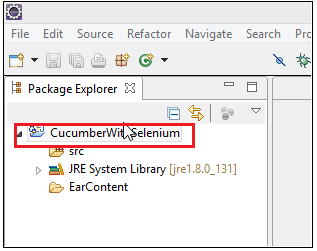
步骤 1) 在 Eclipse 中创建项目。
创建一个名为“CucumberWithSelenium”的 Java 项目,如以下屏幕截图所示。
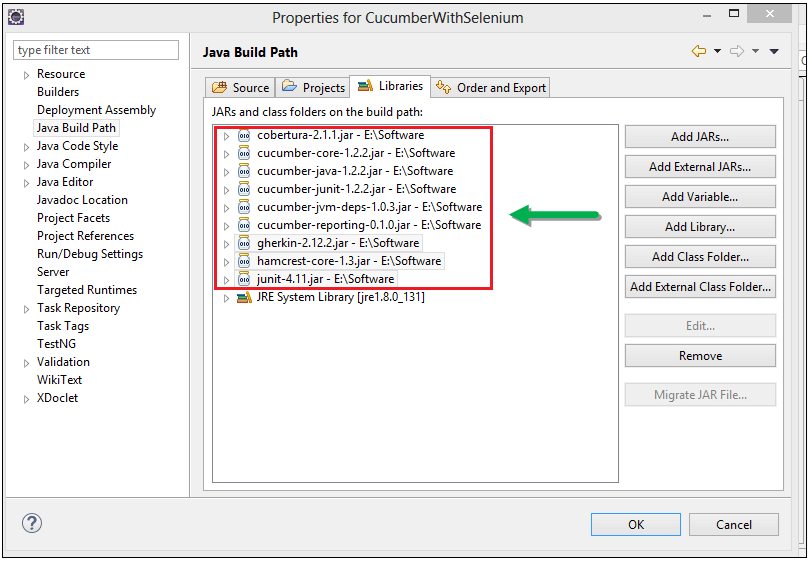
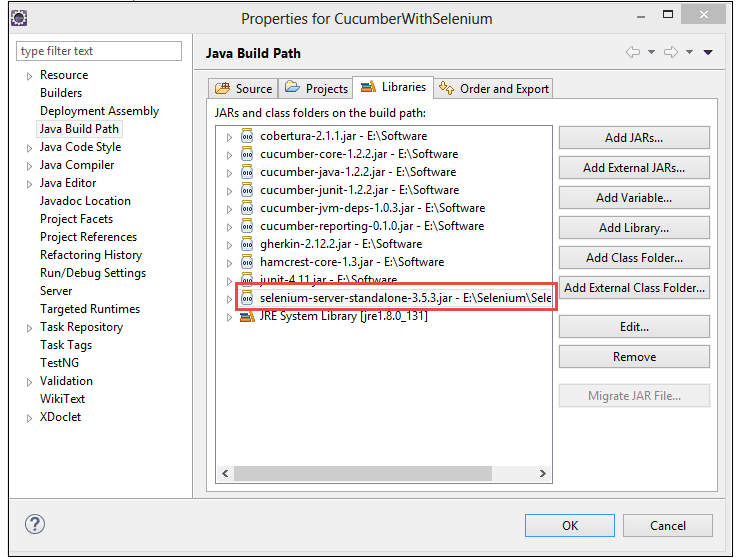
步骤 2) 在项目中添加 Jar 文件。
右键单击项目 > 选择属性 > 转到 Java 构建路径。添加所有先前下载的库。
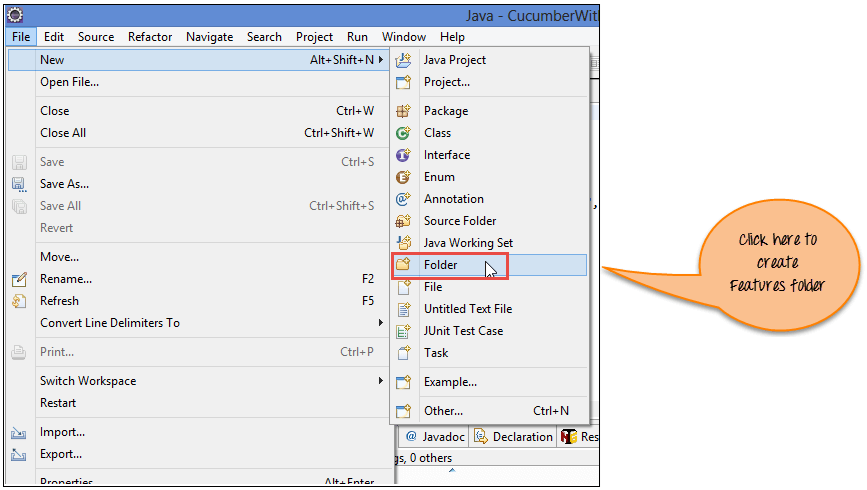
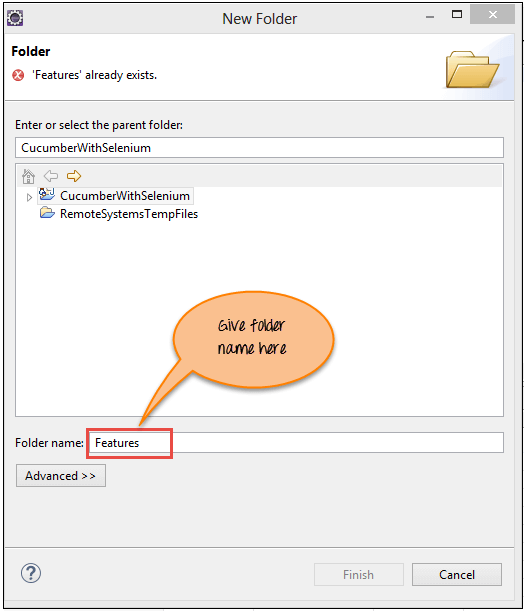
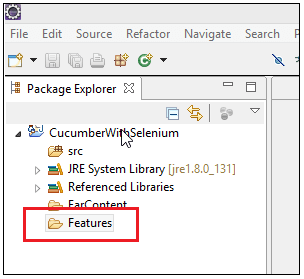
步骤 3) 创建特性文件
为了创建特性文件,首先创建一个特性文件夹,如以下屏幕截图所示。
现在输入文件夹名“Features”并单击“Finish”按钮。
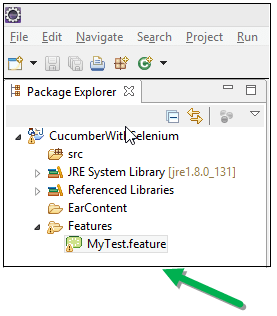
现在,在“Features”文件夹中创建一个名为“MyTest.feature”的特性文件 – 过程与创建文件夹类似
注意:您可能需要安装 Cucumber Eclipse 插件才能使其工作。转到 — 帮助 -> 安装新软件 -> 复制并粘贴链接 http://cucumber.github.io/cucumber-eclipse/update-site/ 并安装
步骤 4) 编写场景。
以下行使用 Gherkin 语言写入“MyTest.feature”文件,如下所示
Feature: Reset functionality on login page of Application


Scenario: Verification of Reset button


Given Open the Firefox and launch the application


When Enter the Username and Password


Then Reset the credential
代码解释
第 1 行) 在此行中,我们编写业务功能。
第 2 行) 在此行中,我们编写要测试的场景。
第 3 行) 在此行中,我们定义先决条件。
第 4 行) 在此行中,我们定义需要执行的操作。
第 5 行) 在此行中,我们定义预期结果。
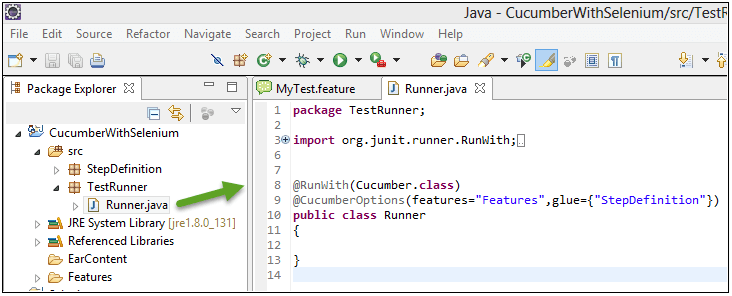
步骤 5) 编写用于 Selenium Cucumber 框架设计的 Selenium 测试运行器脚本
这里我们创建“TestRunner”包,然后在其中创建“Runner.java”类文件。
package TestRunner;

import org.junit.runner.RunWith;
import cucumber.api.CucumberOptions;
import cucumber.api.junit.Cucumber;

@RunWith(Cucumber.class)
@CucumberOptions(features="Features",glue={"StepDefinition"})
public class Runner
{

}
在上面的 Cucumber Java 示例代码中,我们通过使用以下注解来运行 Cucumber 测试
@RunWith() 注解告诉测试运行器类开始执行我们的测试。
@CucumberOptions() 注解用于为我们的 Cucumber 测试设置一些属性,如特性文件、步骤定义等。
TestRunner 文件的屏幕截图。
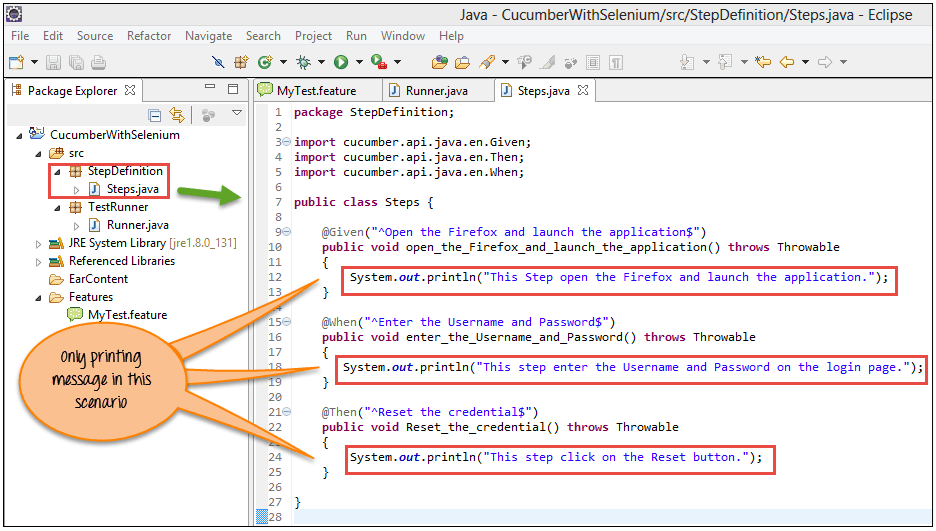
步骤 6) 创建步骤定义脚本。
现在,我们在这里创建“StepDefinition”包,然后在其中创建“Steps.java”脚本文件。在这里,我们实际编写 Selenium 脚本以在 Cucumber 方法下执行测试。
package StepDefinition;

import cucumber.api.java.en.Given;
import cucumber.api.java.en.Then;
import cucumber.api.java.en.When;

public class Steps {


    @Given("^Open the Firefox and launch the application$")
    public void open_the_Firefox_and_launch_the_application() throws Throwable
    {
        System.out.println("This Step open the Firefox and launch the application.");
    }

    @When("^Enter the Username and Password$")
    public void enter_the_Username_and_Password() throws Throwable
    {
       System.out.println("This step enter the Username and Password on the login page.");
    }

    @Then("^Reset the credential$")
    public void Reset_the_credential() throws Throwable
    {
        System.out.println("This step click on the Reset button.");
    }

}
在上面的代码中,创建了名为“Steps”的类。Cucumber 注解用于映射特性文件。定义了每个注解方法
@Given 注解定义了打开 Firefox 并启动应用程序的方法
@When 注解定义了输入用户名和密码的方法
@Then 注解定义了重置凭据的方法
在每个方法下,我们只打印一条消息。
下面是“Steps.java”脚本和项目树的屏幕截图,它看起来像什么。
注意:步骤定义只是您要在此 Cucumber 方法下执行的步骤。
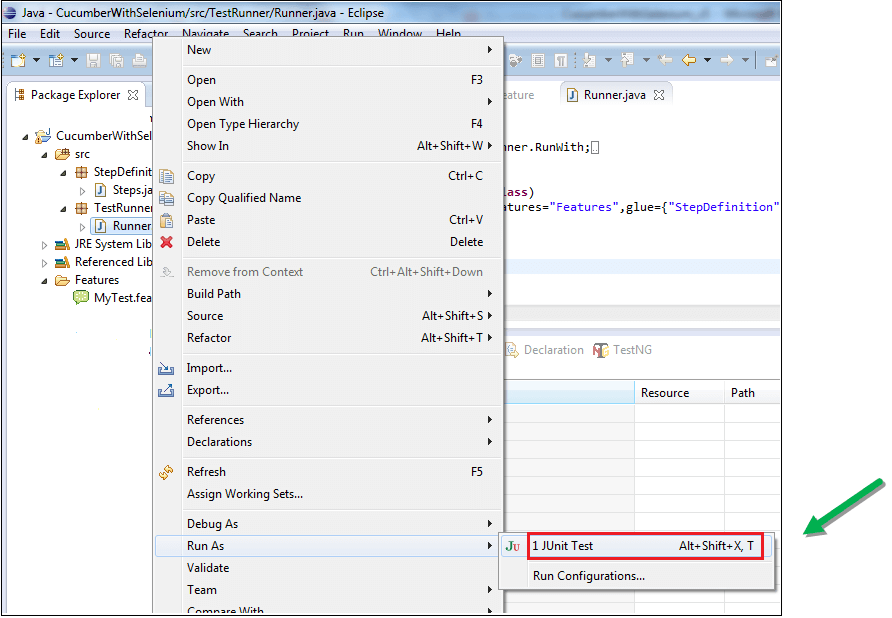
步骤 7) 执行脚本。
用户可以从测试运行器脚本(即“Runner.java”)执行此脚本,如以下屏幕截图所示。
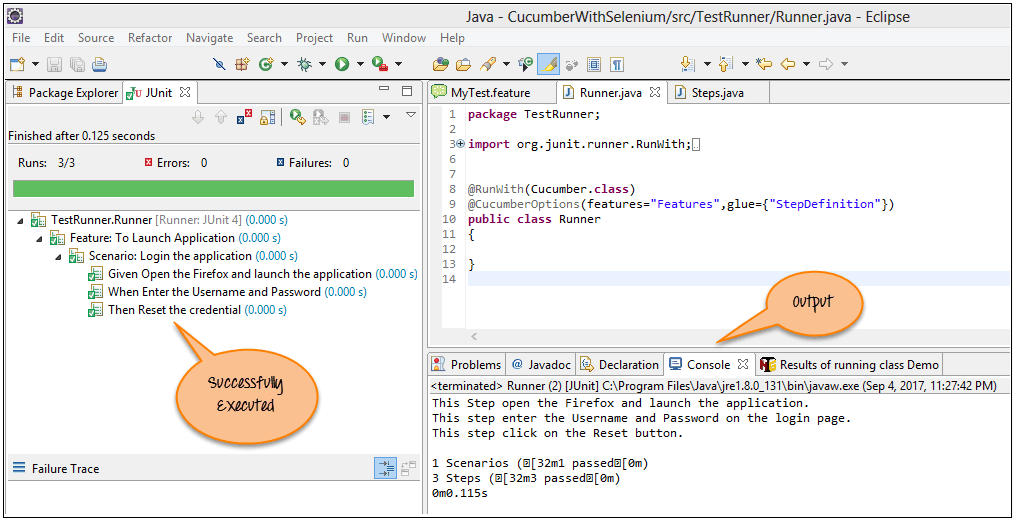
步骤 8) 分析输出。
执行“Runner.java”脚本后,它会在控制台上显示文本。这是在“Steps.java”脚本中定义的相同文本。
场景 2:输入登录凭据并重置值。
在这里,我们将只在 Guru99 演示登录页面上输入凭据并重置值
对于场景 2,我们只需要更新“Steps.java”脚本。在这里,我们实际编写 Selenium 脚本,如下面步骤所示。首先,我们需要将 Selenium jar 文件添加到此项目。
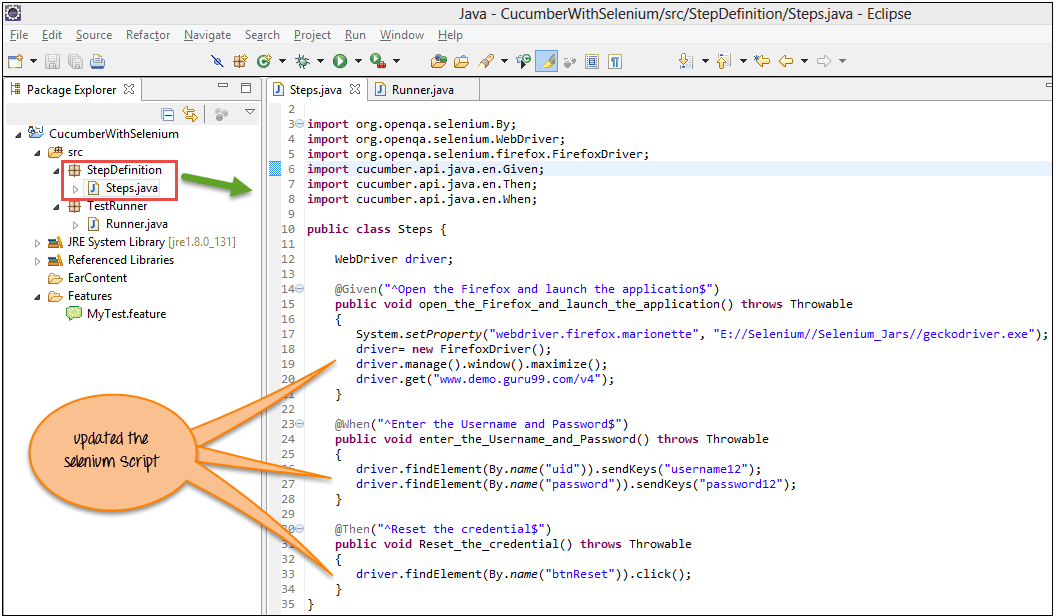
步骤 1) 这里我们更新“Steps.java”脚本,如以下代码和屏幕截图所示。
package StepDefinition;

import org.openqa.selenium.By;
import org.openqa.selenium.WebDriver;
import org.openqa.selenium.firefox.FirefoxDriver;

import cucumber.api.java.en.Given;
import cucumber.api.java.en.Then;
import cucumber.api.java.en.When;

public class Steps {

    WebDriver driver;

    @Given("^Open the Firefox and launch the application$")
    public void open_the_Firefox_and_launch_the_application() throws Throwable
    {
       System.setProperty("webdriver.gecko.driver", "E://Selenium//Selenium_Jars//geckodriver.exe");
       driver= new FirefoxDriver();
       driver.manage().window().maximize();
       driver.get("http://demo.guru99.com/v4");
    }

    @When("^Enter the Username and Password$")
    public void enter_the_Username_and_Password() throws Throwable
    {
       driver.findElement(By.name("uid")).sendKeys("username12");
       driver.findElement(By.name("password")).sendKeys("password12");
    }

    @Then("^Reset the credential$")
    public void Reset_the_credential() throws Throwable
    {
       driver.findElement(By.name("btnReset")).click();
    }
}
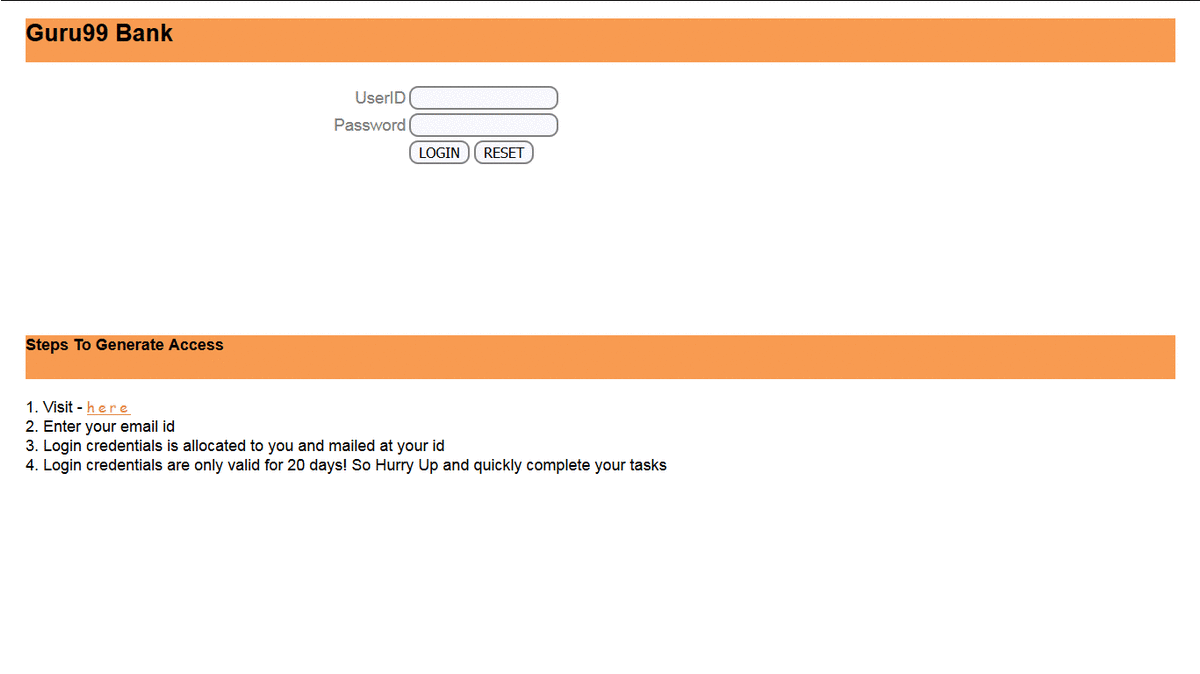
上述 Selenium 脚本的屏幕截图。
步骤 2) 执行脚本。
更新后,我们运行 Runner.java。
步骤 3) 分析输出。
在输出中您可以看到以下内容
- 浏览器已启动。
- Guru99 银行演示网站已打开。
- 用户名和密码已放置在登录页面上。
- 重置值。

场景 3:在 Guru99 上输入登录凭据并重置值。对 3 组数据执行此操作。
在这里我们需要更新“Step.java”和特性文件。
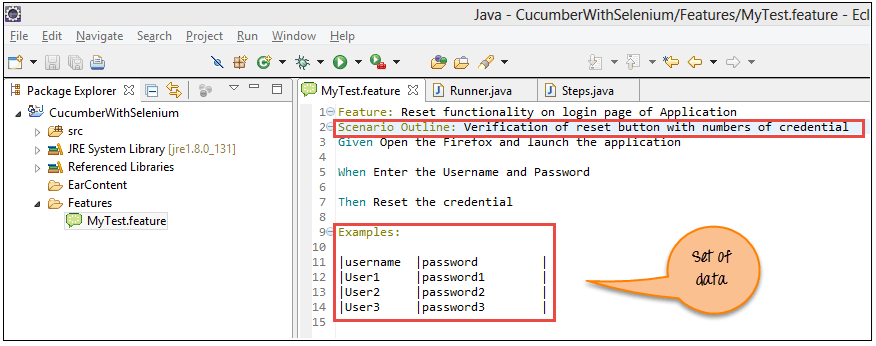
步骤 1) 更新特性文件,如下所示
Here we update the feature file with 'Scenario Outline' and  'examples' syntax.

Feature: Reset functionality on login page of Application


Scenario Outline: Verification of reset button with numbers of credential


Given Open the Firefox and launch the application


When Enter the Username <username>and Password <password>


Then Reset the credential

Examples:

|username  |password         |

|User1     |password1        |

|User2     |password2        |

|User3     |password3        |

// In this line we define the set of data.
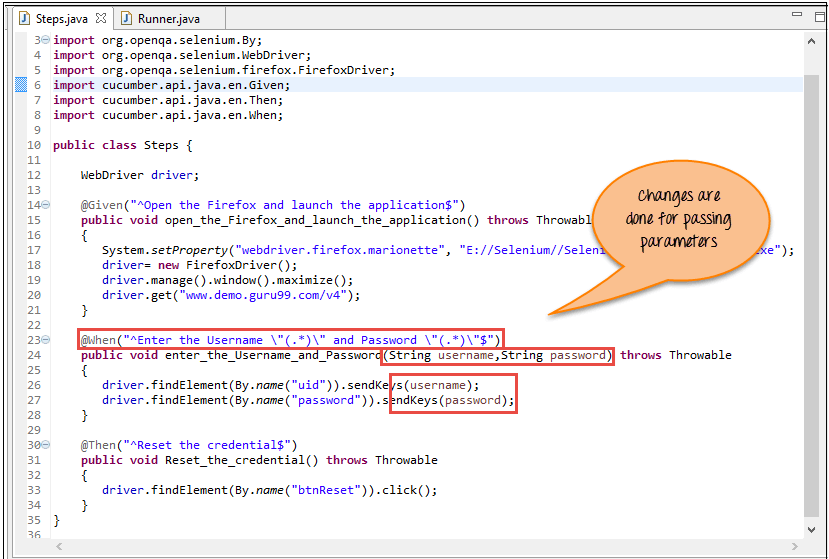
步骤 2) 现在更新 Step.java 脚本。
在这里,我们更新方法以传递参数,更新后的脚本如下所示
package StepDefinition;

import org.openqa.selenium.By;
import org.openqa.selenium.WebDriver;
import org.openqa.selenium.firefox.FirefoxDriver;

import cucumber.api.java.en.Given;
import cucumber.api.java.en.Then;
import cucumber.api.java.en.When;

public class Steps {

    WebDriver driver;

    @Given("^Open the Firefox and launch the application$")
    public void open_the_Firefox_and_launch_the_application() throws Throwable
    {
       System.setProperty("webdriver.gecko.driver", "E://Selenium//Selenium_Jars//geckodriver.exe");
       driver= new FirefoxDriver();
       driver.manage().window().maximize();
       driver.get("www.demo.guru99.com/v4");
    }

    @When("^Enter the Username \"(.*)\" and Password \"(.*)\"$")
    public void enter_the_Username_and_Password(String username,String password) throws Throwable
    {
       driver.findElement(By.name("uid")).sendKeys(username);
       driver.findElement(By.name("password")).sendKeys(password);
    }

    @Then("^Reset the credential$")
    public void	Reset_the_credential() throws Throwable
    {
       driver.findElement(By.name("btnReset")).click();
    }
}
步骤 3) 现在执行更新后的脚本。
下面的屏幕显示了脚本的成功执行以及每组数据所花费的时间。
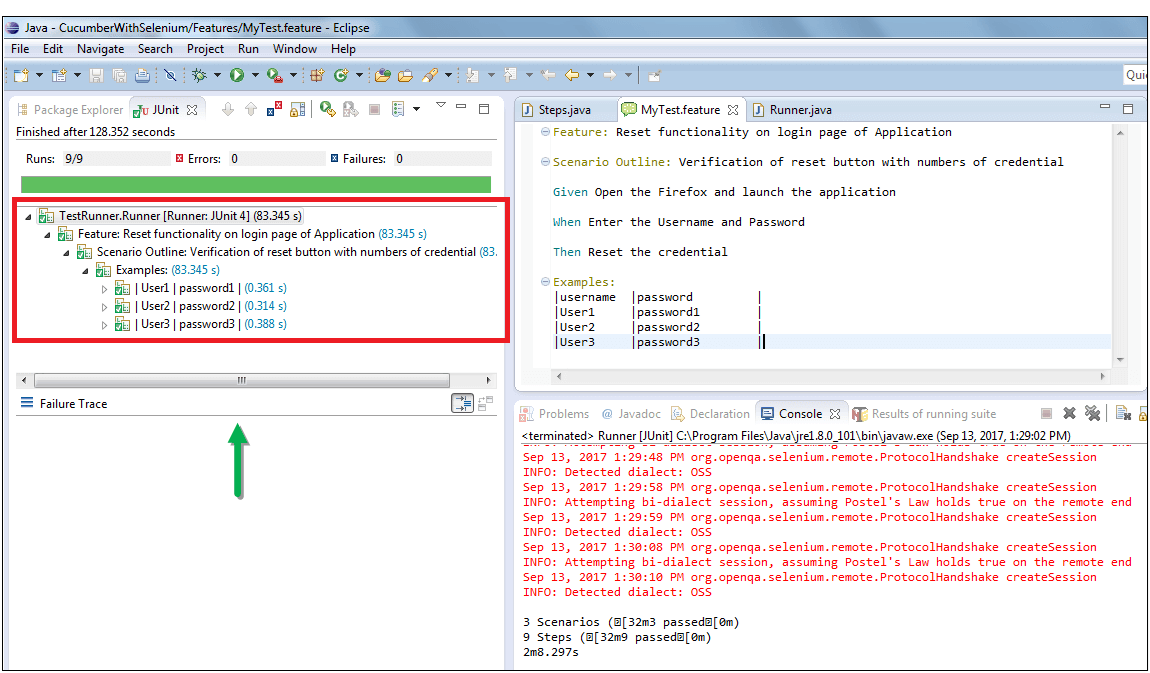
步骤 4) 分析输出。
在输出中您可以看到以下内容
以下输出会重复数据集的数量,即 3 组。
- 浏览器已启动。
- Guru99 银行演示网站已打开。
- 用户名和密码已放置在登录页面上。
- 重置值。
结论
Cucumber 是一种非常流行的 BDD 工具。它易于阅读,并且可以被所有利益相关者(包括技术和非技术人员)理解。
Cucumber 可以通过以下 3 个步骤与 Selenium 集成
- 创建特性文件,其中使用 Gherkin 语言逐步定义特性和场景。
- 创建 Testrunner 文件。在此文件中,我们将 Cucumber 与 Selenium 中的 BDD 框架集成。我们执行此脚本。
- 创建步骤定义,实际的 Selenium 脚本在此包下定义。