如何在 Selenium 中验证工具提示
Selenium 中的工具提示
在 **Selenium 中,工具提示**是指当鼠标悬停在网页上的对象(可以是链接、图像、按钮、文本区域等)时出现的文本。工具提示文本通常提供有关用户将鼠标悬停在其上的对象的更多信息。
工具提示传统上是作为元素的“title”属性实现的。此属性的值在鼠标悬停时显示为工具提示。这是一个静态文本,提供有关元素的信息,没有样式。
现在,有许多插件可用于实现“工具提示”。使用 JavaScript/JQuery 插件或 CSS 工具提示实现了具有样式、渲染、图像和链接的高级工具提示。
- 为了访问或验证使用 HTML“title”属性实现的静态工具提示,我们只需使用 WebElement 的 getAttribute(“title”) 方法。此方法返回的值(即工具提示文本)与预期值进行比较以进行验证。
- 对于其他形式的工具提示实现,我们将不得不使用 Web Driver 提供的“高级用户交互 API”来创建鼠标悬停效果,然后检索元素的工具提示。
高级用户交互 API 简介
高级用户交互 API 提供用于用户操作的 API,例如拖放、悬停、多选、按键和释放以及使用键盘或鼠标在网页上的其他操作。
您可以参考此链接以获取有关 API 的更多详细信息。
在这里,让我们看看如何使用我们需要移动滑块元素的几个类和方法。
步骤 1) 为了使用 API,需要导入以下包/类

步骤 2) 创建“Actions”类的对象并构建用户操作序列。Actions 类用于构建用户操作序列,例如 moveToElement()、dragAndDrop() 等。API 提供了与用户操作相关的各种方法。
驱动程序对象作为参数提供给其构造函数。

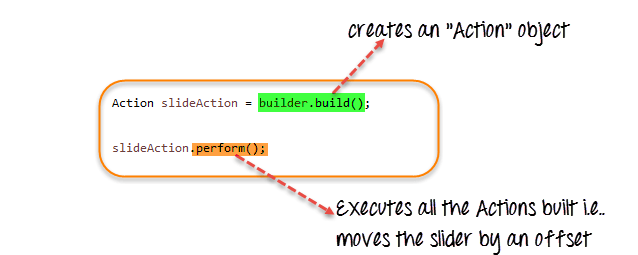
步骤 3) 使用“Actions”类的 build() 方法创建 Action 对象。调用 perform() 方法以执行 Actions 对象(此处为 builder)构建的所有操作。
我们已经了解了如何使用 API 提供的一些用户 Actions 方法——clickAndHold(element)、moveByOffset(10,0)、release()。API 提供了许多此类方法。
有关更多详细信息,请参阅链接。
如何在 Selenium 中验证(处理)工具提示
让我们看看在简单场景中访问和验证工具提示的演示
- 场景 1:工具提示使用“title”属性实现
- 场景 2:工具提示使用 jQuery 插件实现。
场景 1:HTML 'title' 属性
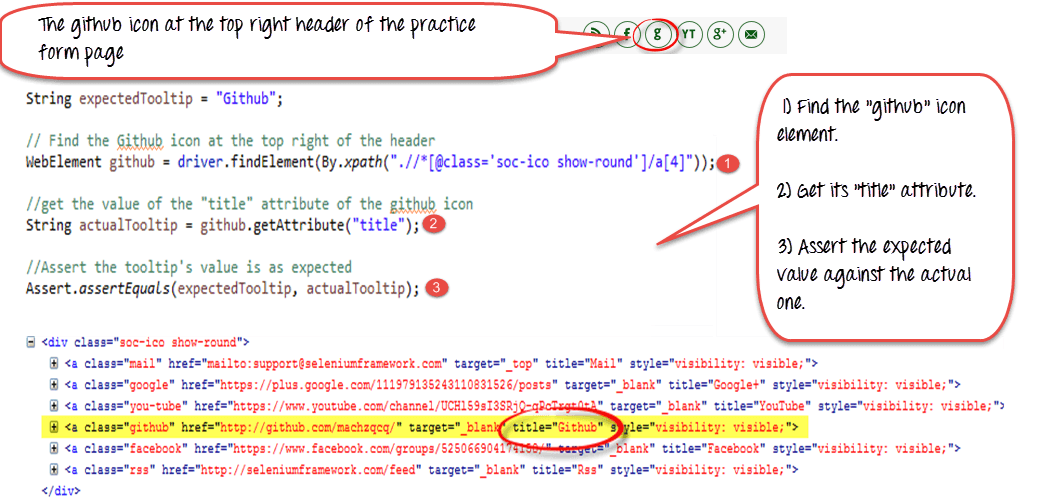
对于此情况,我们以示例站点为例 – https://demo.guru99.com/test/social-icon.html。
我们将尝试验证页面右上角“github”图标的工具提示。

为此,我们首先找到元素并获取其“title”属性,然后与预期的工具提示文本进行验证。
由于我们假设工具提示在“title”属性中,我们甚至没有自动化鼠标悬停效果,而只是使用“getAttribute()”方法检索属性的值。
这是代码
import org.openqa.selenium.By;
import org.openqa.selenium.WebDriver;
import org.openqa.selenium.chrome.ChromeDriver;
import org.openqa.selenium.*;

public class ToolTip {
    public static void main(String[] args) {

        String baseUrl = "https://demo.guru99.com/test/social-icon.html";
        System.setProperty("webdriver.chrome.driver","G:\\chromedriver.exe");
        WebDriver driver = new ChromeDriver();
        driver.get(baseUrl);
        String expectedTooltip = "Github";

        // Find the Github icon at the top right of the header
        WebElement github = driver.findElement(By.xpath(".//*[@class='soc-ico show-round']/a[4]"));

        //get the value of the "title" attribute of the github icon
        String actualTooltip = github.getAttribute("title");

        //Assert the tooltip's value is as expected
        System.out.println("Actual Title of Tool Tip"+actualTooltip);
        if(actualTooltip.equals(expectedTooltip)) {
            System.out.println("Test Case Passed");
        }
        driver.close();
   }
}
代码解释
- 查找表示“github”图标的 WebElement。
- 使用 getAttribute() 方法获取其“title”属性。
- 将值与预期的工具提示值进行断言。
场景 2:JQuery 插件
有大量可用的 JQuery 插件来实现工具提示,每个插件的实现形式略有不同。
有些插件期望工具提示 HTML 始终存在于其适用的元素旁边,而另一些插件则创建动态“div”标签,该标签在悬停在元素上时动态出现。
对于我们的演示,让我们考虑“jQuery Tools Tooltip”方式的工具提示实现。
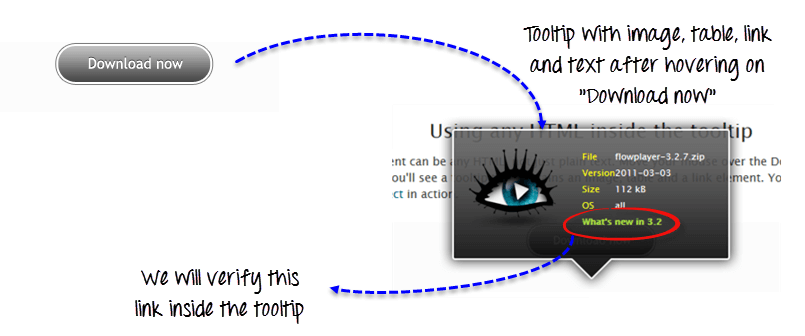
在此 URL 中 – https://demo.guru99.com/test/tooltip.html 您可以看到演示,当鼠标悬停在“Download now”上时,我们会得到一个高级工具提示,其中包含图像、标注背景、表格和内部可点击的链接。
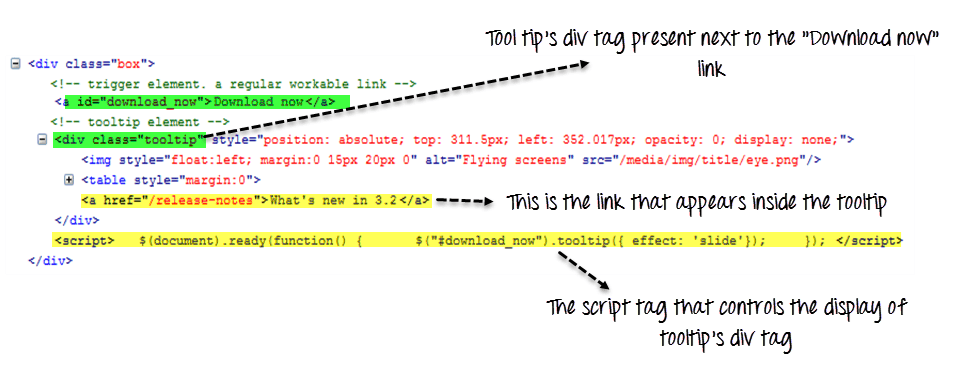
如果您查看下面的源代码,您可以看到表示工具提示的 div 标签始终存在于“Download now”链接标签旁边。但是,脚本标签中的代码控制何时需要弹出。
让我们在这里尝试仅验证工具提示中的链接文本以进行演示。
我们首先找到与“Download now”对应的 WebElement。然后使用 Interactions API,我们将移动到元素(鼠标悬停)。接下来,我们将找到与显示工具提示中的链接对应的 WebElement,并将其与预期文本进行验证。
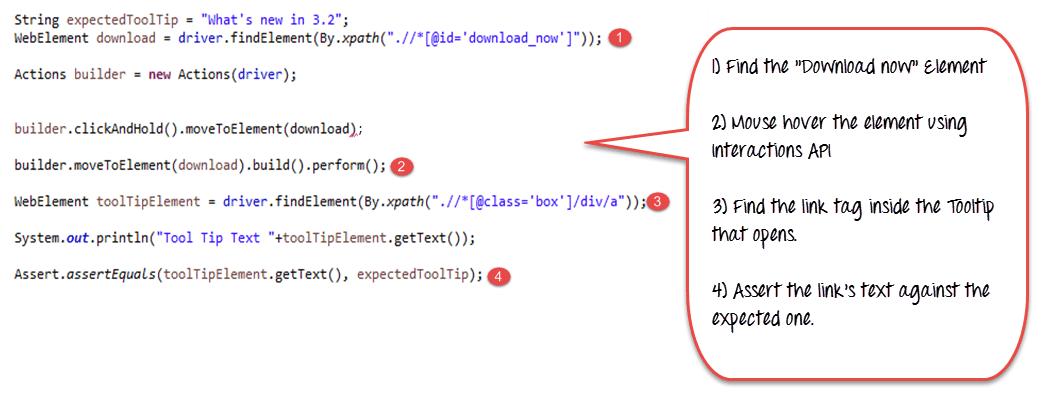
这是代码
import org.openqa.selenium.interactions.Action;
import org.openqa.selenium.interactions.Actions;
import org.openqa.selenium.By;
import org.openqa.selenium.WebDriver;
import org.openqa.selenium.chrome.ChromeDriver;
import org.openqa.selenium.*;

public class JqueryToolTip {
    public static void main(String[] args) {

        String baseUrl = "https://demo.guru99.com/test/tooltip.html";
        System.setProperty("webdriver.chrome.driver","G:\\chromedriver.exe");

        WebDriver driver = new ChromeDriver();
        String expectedTooltip = "What's new in 3.2";
        driver.get(baseUrl);

        WebElement download = driver.findElement(By.xpath(".//*[@id='download_now']"));
        Actions builder = new Actions (driver);

        builder.clickAndHold().moveToElement(download);
        builder.moveToElement(download).build().perform();

        WebElement toolTipElement = driver.findElement(By.xpath(".//*[@class='box']/div/a"));
        String actualTooltip = toolTipElement.getText();

        System.out.println("Actual Title of Tool Tip  "+actualTooltip);
        if(actualTooltip.equals(expectedTooltip)) {
            System.out.println("Test Case Passed");
        }
        driver.close();
   }
}
代码解释
- 查找与我们将鼠标悬停的元素“download now”对应的 WebElement。
- 使用 Interactions API,鼠标悬停在“Download now”上。
- 假设工具提示已显示,找到与工具提示中的链接(即“a”标签)对应的 WebElement。
- 验证使用 getText() 检索到的链接的工具提示文本与我们存储在“expectedToolTip”中的预期值。
摘要
在本教程中,您已学习如何使用 Selenium WebDriver 访问工具提示。
工具提示以不同方式实现——
- 基本实现基于 HTML 的“title”属性。getAttribute(title) 获取工具提示的值。
- 其他工具提示实现,如 JQuery、CSS 工具提示,需要 Interactions API 来创建鼠标悬停效果。
高级用户交互 API——
- Actions 类的 moveToElement(element) 用于鼠标悬停元素。
- Actions 类的 build() 方法将用户操作序列构建成一个 Action 对象。
- Action 类的 perform() 一次性执行所有用户操作序列。
为了验证工具提示,我们必须首先鼠标悬停元素,然后找到与工具提示对应的元素并获取其文本或其他值以与预期值进行验证。