在Selenium WebDriver中定制、生成PDF和发送电子邮件TestNG报告
在我们探讨其他内容之前,首先让我们了解一下:
为什么我们需要报告?
当我们使用Selenium或任何其他自动化工具时,我们正在对Web应用程序执行操作。但我们自动化的目的不仅仅是运行被测应用程序。作为自动化测试人员,我们应该测试应用程序,发现错误并将其报告给开发团队或高级管理层。在这里,报告对于软件测试过程变得很重要。
TestNG 报告
TestNG 库提供了非常便捷的报告功能。执行后,Testng 会在项目根目录下生成一个 test-output 文件夹。此文件夹包含两种类型的报告:
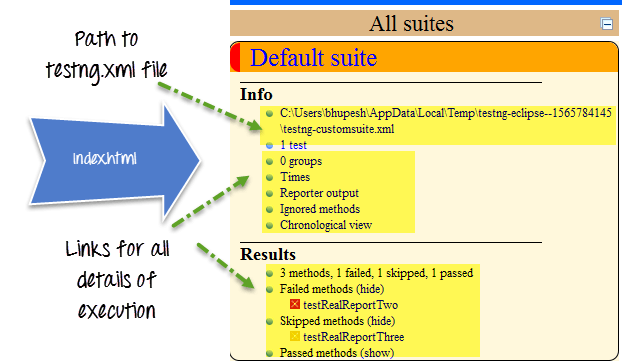
Index.html: 这是当前执行的完整报告,包含错误、组、时间、报告器日志、testng XML 文件等信息。
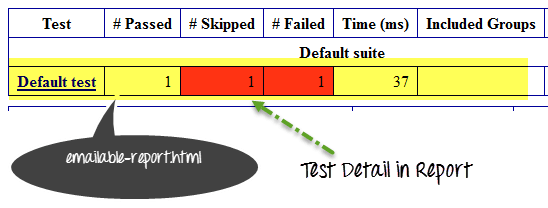
emailable-report.html: 这是当前测试执行的摘要报告,其中包含绿色(表示通过的测试用例)和红色(表示失败的测试用例)高亮的测试用例消息。
如何自定义 TestNG 报告
TestNG 报告非常方便,但有时我们仍然需要在报告中减少数据,或者希望以其他格式(如PDF、Excel等)显示报告,或者希望更改报告的布局。
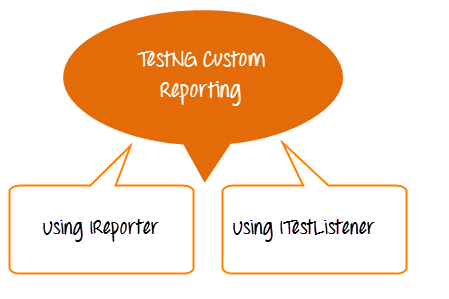
我们可以通过两种方式自定义 TestNG 报告
- 使用 ITestListener 接口
- 使用 IReporter 接口
ITestListener 接口
当我们需要实时定制报告时,我们会使用这个接口。换句话说,如果我们在 TetNG 套件中执行一组测试用例,并且我们希望获得每个测试用例的报告,那么在每个测试用例之后,我们需要实现 ITestListener 接口。这个接口将覆盖 onTestFailure、onTestStart、onTestSkipped 方法以发送当前测试用例的正确状态。
以下是我们将遵循的步骤
- 创建一个名为 RealGuru99Report 的类,并实现 iTestListener。
- 实现 iTestListener 的方法
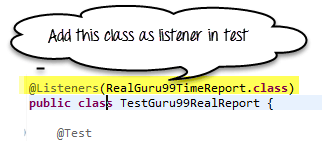
- 创建测试方法,并将 RealGuru99Report 类作为监听器添加到测试方法类中。
代码示例
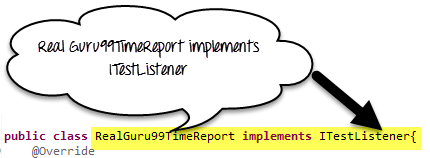
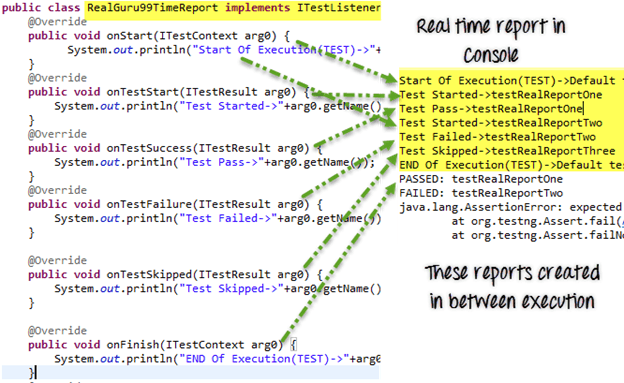
RealGuru99TimeReport.java 是实时报告类。它将实现 ITestListener 接口进行报告。
package testNGReport.realTimeReport;

import org.testng.ITestContext;

import org.testng.ITestListener;

import org.testng.ITestResult;

public class RealGuru99TimeReport implements ITestListener{

    @Override

    public void onStart(ITestContext arg0) {

         System.out.println("Start Of Execution(TEST)->"+arg0.getName());

    }

    @Override

    public void onTestStart(ITestResult arg0) {

        System.out.println("Test Started->"+arg0.getName());

    }

    @Override

    public void onTestSuccess(ITestResult arg0) {

        System.out.println("Test Pass->"+arg0.getName());

    }

    @Override

    public void onTestFailure(ITestResult arg0) {

        System.out.println("Test Failed->"+arg0.getName());

    }

    @Override

    public void onTestSkipped(ITestResult arg0) {

        System.out.println("Test Skipped->"+arg0.getName());

    }

    @Override

    public void onFinish(ITestContext arg0) {

System.out.println("END Of Execution(TEST)->"+arg0.getName());

    }

    @Override

    public void onTestFailedButWithinSuccessPercentage(ITestResult arg0) {

        // TODO Auto-generated method stub


    }


}
TestGuru99RealReport.java 是实时报告的测试用例。
package testNGReport.realTimeReport;

import org.testng.Assert;

import org.testng.annotations.Listeners;

import org.testng.annotations.Test;

@Listeners(RealGuru99TimeReport.class)

public class TestGuru99RealReport {

    @Test

    public void testRealReportOne(){

        Assert.assertTrue(true);

    }


    @Test

    public void testRealReportTwo(){

        Assert.assertTrue(false);

    }

    //Test case depends on failed testcase= testRealReportTwo

    @Test(dependsOnMethods="testRealReportTwo")

    public void testRealReportThree(){


    }

}
输出将如下所示:
IReporter 接口
如果我们想自定义 TestNG 生成的最终测试报告,我们需要实现 IReporter 接口。此接口只有一个方法需要实现,即 generateReport。此方法在 List<ISuite> 中包含完整测试执行的所有信息,我们可以使用它来生成报告。
代码示例
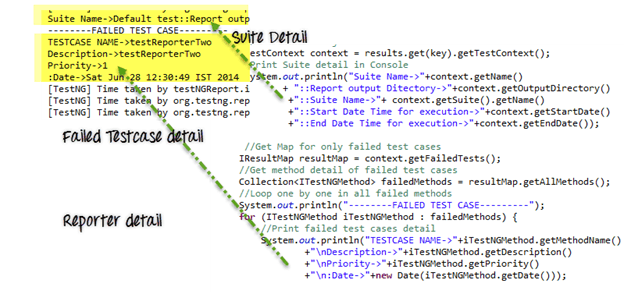
Guru99Reporter.java 是用于自定义报告的文件。
package testNGReport.iReporterReport;

import java.util.Collection;

import java.util.Date;

import java.util.List;

import java.util.Map;

import java.util.Set;

import org.testng.IReporter;

import org.testng.IResultMap;

import org.testng.ISuite;

import org.testng.ISuiteResult;

import org.testng.ITestContext;

import org.testng.ITestNGMethod;

import org.testng.xml.XmlSuite;

public class Guru99Reporter implements IReporter{

    @Override

    public void generateReport(List<XmlSuite> arg0, List<ISuite> arg1,

            String outputDirectory) {

        // Second parameter of this method ISuite will contain all the suite executed.

        for (ISuite iSuite : arg1) {

         //Get a map of result of a single suite at a time

            Map<String,ISuiteResult> results =    iSuite.getResults();

         //Get the key of the result map

            Set<String> keys = results.keySet();

        //Go to each map value one by one

            for (String key : keys) {

             //The Context object of current result

            ITestContext context = results.get(key).getTestContext();

            //Print Suite detail in Console

             System.out.println("Suite Name->"+context.getName()

                    + "::Report output Ditectory->"+context.getOutputDirectory()

                     +"::Suite Name->"+ context.getSuite().getName()

                     +"::Start Date Time for execution->"+context.getStartDate()

                     +"::End Date Time for execution->"+context.getEndDate());


             //Get Map for only failed test cases

            IResultMap resultMap = context.getFailedTests();

            //Get method detail of failed test cases

            Collection<ITestNGMethod> failedMethods = resultMap.getAllMethods();

            //Loop one by one in all failed methods

            System.out.println("--------FAILED TEST CASE---------");

            for (ITestNGMethod iTestNGMethod : failedMethods) {

                //Print failed test cases detail

                System.out.println("TESTCASE NAME->"+iTestNGMethod.getMethodName()

                        +"\nDescription->"+iTestNGMethod.getDescription()

                        +"\nPriority->"+iTestNGMethod.getPriority()

                        +"\n:Date->"+new Date(iTestNGMethod.getDate()));


            }

        }

        }


    }

}
TestGuru99ForReporter.java 是自定义报告的演示。
package testNGReport.iReporterReport;

import org.testng.Assert;

import org.testng.annotations.Listeners;

import org.testng.annotations.Test;

//Add listener to listen report and write it when testcas finished

@Listeners(value=Guru99Reporter.class)

public class TestGuru99ForReporter {

    @Test(priority=0,description="testReporterOne")

    public void testReporterOne(){

        //Pass test case

        Assert.assertTrue(true);

    }


    @Test(priority=1,description="testReporterTwo")

    public void testReporterTwo(){

        //Fail test case

        Assert.assertTrue(false);

    }

}
输出将如下所示:
报告的 PDF 和电子邮件
上述报告实现相当简单明了,可帮助您开始报告定制。
但在企业环境中,您需要创建高度定制的报告。以下是我们将处理的场景:
- 创建PDF格式的自定义报告
- 仅在错误发生时截屏。在PDF中链接截屏
- 发送PDF报告的电子邮件
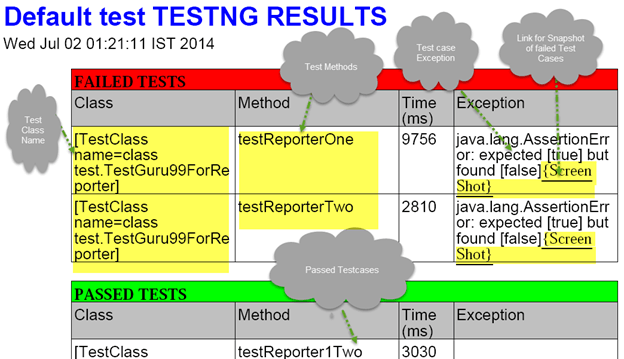
PDF报告如下所示
要创建 PDF 报告,我们需要一个 Java API IText。在此下载。还有另一个自定义监听器类,它实际上实现了这个 IText jar 并为我们创建了一个 PDF 报告。在此下载。
上图显示了生成的PDF报告的默认格式。您可以自定义它。
我们将这样处理:
步骤 1) 创建基类
步骤 2) 自定义 JypersionListerner.Java (PDF 创建代码)
步骤 3) 创建 TestGuru99PDFEmail.java,它将执行测试用例,创建 PDF。
步骤 4) 将代码附加到 TestGuru99PDFEmail.java 以通过电子邮件发送 PDF 报告。
让我们看看这些步骤
步骤 1) 创建基类
此基类具有创建 WebDriver 和截屏的功能。
package PDFEmail;

import java.io.File;

import org.apache.commons.io.FileUtils;

import org.openqa.selenium.OutputType;

import org.openqa.selenium.TakesScreenshot;

import org.openqa.selenium.WebDriver;

import org.openqa.selenium.firefox.FirefoxDriver;

public class BaseClass {

    static WebDriver driver;

    public static WebDriver getDriver(){

        if(driver==null){


        WebDriver driver ;
    	System.setProperty("webdriver.gecko.driver","C:\\geckodriver.exe");
    	driver = new FirefoxDriver();


        }

        return driver;

    }


    /**

     * This function will take screenshot

     * @param webdriver

     * @param fileWithPath

     * @throws Exception

     */

    public static void takeSnapShot(WebDriver webdriver,String fileWithPath) throws Exception{

        //Convert web driver object to TakeScreenshot

        TakesScreenshot scrShot =((TakesScreenshot)webdriver);

        //Call getScreenshotAs method to create image file

                File SrcFile=scrShot.getScreenshotAs(OutputType.FILE);

            //Move image file to new destination

                File DestFile=new File(fileWithPath);

                //Copy file at destination

                FileUtils.copyFile(SrcFile, DestFile);


    }

}
步骤 2) 自定义 JypersionListener.java
我们将保持默认的报告格式。但我们将进行 2 处自定义:
- 添加代码以指示 JypersionListener 在错误时截屏。
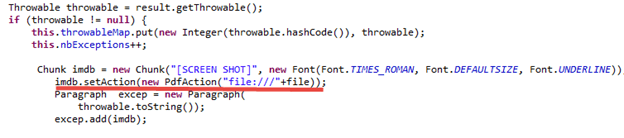
- 在PDF报告中附加截图链接。
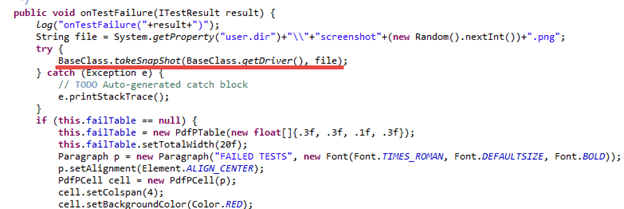
添加代码以将屏幕截图附加到 PDF 报告中
步骤 3) 创建 TestGuru99PDFEmail.java,它将执行测试用例,创建 PDF。
- 这里我们将 JyperionListener.class 添加为监听器。
- 我们将执行 3 个测试用例。
- 使用 Assert.assertTrue,我们将使 2 个测试用例失败,同时只通过一个。
- 根据我们的定制,只对失败的测试用例进行截图。
package PDFEmail;

import java.util.Properties;

import javax.activation.DataHandler;

import javax.activation.DataSource;

import javax.activation.FileDataSource;

import javax.mail.BodyPart;

import javax.mail.Message;

import javax.mail.MessagingException;

import javax.mail.Multipart;

import javax.mail.Session;

import javax.mail.Transport;

import javax.mail.internet.AddressException;

import javax.mail.internet.InternetAddress;

import javax.mail.internet.MimeBodyPart;

import javax.mail.internet.MimeMessage;

import javax.mail.internet.MimeMultipart;

import org.openqa.selenium.WebDriver;

import org.testng.Assert;

import org.testng.annotations.AfterSuite;

import org.testng.annotations.Listeners;

import org.testng.annotations.Test;

import reporter.JyperionListener;

//Add listener for pdf report generation

@Listeners(JyperionListener.class)

public class TestGuru99PDFReport extends BaseClass {

    WebDriver driver;

    //Testcase failed so screen shot generate

    @Test

    public void testPDFReportOne(){

        driver = BaseClass.getDriver();

        driver.get("http://google.com");

        Assert.assertTrue(false);

    }


    //Testcase failed so screen shot generate

    @Test

    public void testPDFReporTwo(){

        driver = BaseClass.getDriver();

        driver.get("http:/guru99.com");

        Assert.assertTrue(false);

    }


    //Test test case will be pass, so no screen shot on it

    @Test

    public void testPDFReportThree(){

        driver = BaseClass.getDriver();

        driver.get("https://demo.guru99.com");

        Assert.assertTrue(true);

    }
步骤 4) 将代码附加到 TestGuru99PDFEmail.java 以通过电子邮件发送 PDF 报告。
- 我们将使用 @AfterSuite 注解发送 PDF 报告的电子邮件。
- 我们将使用 Gmail 发送电子邮件。
- 要启用电子邮件,需要导入许多库文件,如 mail.jar、pop3.jar、smptp.jar 等。
- 在执行此操作之前,请务必输入发件人、收件人电子邮件地址和密码。
 //After complete execution send pdf report by email

    @AfterSuite

    public void tearDown(){

        sendPDFReportByGMail("FROM@gmail.com", "password", "TO@gmail.com", "PDF Report", "");

        }


    /**

     * Send email using java

     * @param from

     * @param pass

     * @param to

     * @param subject

     * @param body

     */

    private static void sendPDFReportByGMail(String from, String pass, String to, String subject, String body) {

Properties props = System.getProperties();

String host = "smtp.gmail.com";

props.put("mail.smtp.starttls.enable", "true");

props.put("mail.smtp.host", host);

props.put("mail.smtp.user", from);

props.put("mail.smtp.password", pass);

props.put("mail.smtp.port", "587");

props.put("mail.smtp.auth", "true");

Session session = Session.getDefaultInstance(props);

MimeMessage message = new MimeMessage(session);

try {

    //Set from address

message.setFrom(new InternetAddress(from));

message.addRecipient(Message.RecipientType.TO, new InternetAddress(to));

//Set subject

message.setSubject(subject);

message.setText(body);

BodyPart objMessageBodyPart = new MimeBodyPart();

objMessageBodyPart.setText("Please Find The Attached Report File!");

Multipart multipart = new MimeMultipart();

multipart.addBodyPart(objMessageBodyPart);

objMessageBodyPart = new MimeBodyPart();

//Set path to the pdf report file

String filename = System.getProperty("user.dir")+"\\Default test.pdf";

//Create data source to attach the file in mail

DataSource source = new FileDataSource(filename);

objMessageBodyPart.setDataHandler(new DataHandler(source));

objMessageBodyPart.setFileName(filename);

multipart.addBodyPart(objMessageBodyPart);

message.setContent(multipart);

Transport transport = session.getTransport("smtp");

transport.connect(host, from, pass);

transport.sendMessage(message, message.getAllRecipients());

transport.close();

}

catch (AddressException ae) {

ae.printStackTrace();

}

catch (MessagingException me) {

me.printStackTrace();

}

}

}
在此处下载完整项目
注意:当我们在PDF中点击屏幕截图链接时,会显示安全对话框。我们必须允许此对话框才能打开PDF。

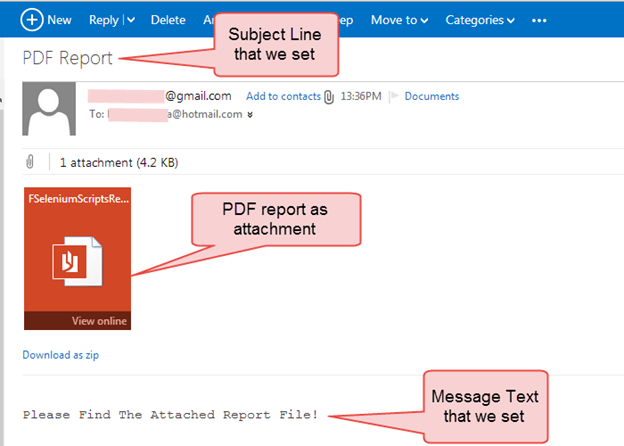
生成的电子邮件将如下所示:
摘要
- TestNG 内置了报告功能。
- 在测试用例完整执行后,TestNG 会在项目根目录下生成一个 test-output 文件夹。
- 在 test-output 文件夹中,有两个主要报告:index.html 和 emailable-report.html。
- 要自定义 TestNG 报告,我们需要实现两个接口:ITestListener 和 IReporter。
- 如果我们需要在执行期间获取报告,则需要 ITestListener。
- 要在完全执行后创建最终报告,我们需要实现 IReporter。
- 在 Selenium WebDriver 中进行屏幕截图,我们需要将 WebDriver 类型转换为 TakesScreenShot 接口。
- 要生成 PDF 报告,我们需要在项目中添加 IText jar 包。