下载 Firefox 和 Selenium 的 Geckodriver
Selenium 中的 GeckoDriver 是什么?
术语 Gecko 代表内置于 Mozilla Firefox 浏览器中的网页浏览器引擎。Gecko 驱动程序充当支持 Web Driver 的客户端(Eclipse、Netbeans 等)与 Mozilla Firefox 浏览器之间的代理。简而言之,Gecko 驱动程序充当 Selenium Web Driver 测试与 Mozilla Firefox 浏览器之间的链接。
在 Selenium 3 之前,Mozilla Firefox 浏览器是 Selenium 的默认浏览器。在 Selenium 3 之后,测试人员需要明确地初始化脚本以使用 GeckoDriver 来使用 Firefox。Selenium 使用 W3C Webdriver 协议向 GeckoDriver 发送请求,GeckoDriver 将这些请求转换为名为 Marionette 的协议。Firefox 将理解以 Marionette 协议形式传输的命令并执行它们。

如何在 Selenium 中下载和安装 GeckoDriver
Gecko Driver 以可执行文件的形式提供,可以下载到系统中。以下是下载 Gecko Driver 的步骤列表。
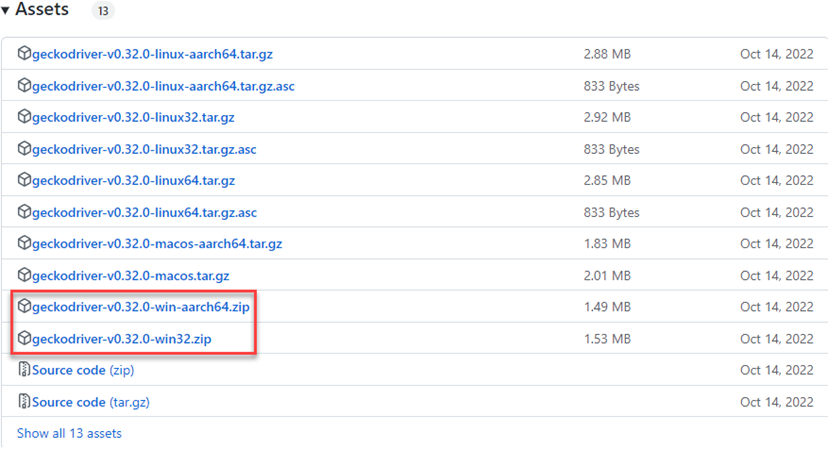
步骤 1 ) 选择合适的版本。
在此页面 https://github.com/mozilla/geckodriver/releases,根据您的操作系统选择合适的 GeckoDriver 下载版本。
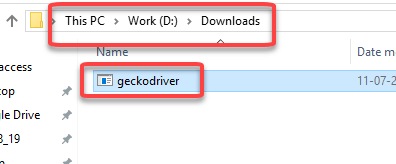
步骤 2) 解压 ZIP 文件。
ZIP 文件下载完成后,将 ZIP 文件的内容解压到一个文件夹中。

步骤 3) 记下位置。
记下您解压驱动程序的位置。此位置稍后将用于实例化驱动程序。
初始化 GeckoDriver 的方法
有三种不同的方法来初始化 GeckoDriver。
1. 使用 DesiredCapabilities
首先,设置 Gecko Driver 的系统属性。
语法
System.setProperty("webdriver.gecko.driver","Path to geckdriver.exe file");
示例
System.setProperty("webdriver.gecko.driver","D:\\Downloads\\GeckoDriver.exe");
接下来,设置 Desired Capabilities。
Desired Capabilities 帮助 Selenium 了解浏览器名称、版本和操作系统以执行自动化测试。以下是使用 DesiredCapabilities 类设置 gecko 驱动程序的代码。
DesiredCapabilities capabilities = DesiredCapabilities.firefox();
capabilities.setCapability("marionette",true);
这是完整的代码
System.setProperty("webdriver.gecko.driver", driverPath);
DesiredCapabilities capabilities = DesiredCapabilities.firefox();
capabilities.setCapability("marionette",true);
driver= new FirefoxDriver(capabilities);
2. 使用 marionette 属性
Gecko 驱动程序也可以使用 marionette 属性进行初始化,如下所示
System.setProperty("webdriver.gecko.driver","D:\\Downloads\\GeckoDriver.exe");
如果使用上述方法初始化 gecko 驱动程序,则不需要 Desired Capabilities 的代码。
3. 使用 FirefoxOptions
Mozilla Firefox 47+ 版本将 marionette 驱动程序作为遗留系统。利用这一点,可以使用 Firefox Options 调用 marionette 驱动程序,如下所示:
FirefoxOptions options = new FirefoxOptions();
options.setLegacy(true);
使用 Gecko 驱动程序启动 Firefox 的代码
package com.guru99.demo;

import org.junit.After;
import org.junit.Before;
import org.junit.Test;
import org.openqa.selenium.WebDriver;
import org.openqa.selenium.firefox.FirefoxDriver;
import org.openqa.selenium.remote.DesiredCapabilities;

public class GeckoDriverDemo {

    String driverPath = "D:\\Guru99Demo\\GeckoDriver.exe";
    public WebDriver driver;

    @Before
    public void startBrowser() {
        System.setProperty("webdriver.gecko.driver", driverPath);
        DesiredCapabilities capabilities = DesiredCapabilities.firefox();
        capabilities.setCapability("marionette", true);
        driver = new FirefoxDriver(capabilities);

    }

    @Test
    public void navigateToUrl() {
        driver.get("https://demo.guru99.com/selenium/guru99home/");
    }

    @After
    public void endTest() {
        driver.quit();
    }

}
代码解释
@Before 方法
首先,我们需要将 gecko 驱动程序的系统属性设置为 geckdriver.exe 文件的下载位置。我们需要将 marionette 属性设置为 true,以便 Selenium 使用 Marionette 协议与 Gecko Driver 通信。最后,我们需要使用 Desired Capabilities 的对象启动 Firefox 浏览器实例。
以下语句有助于完成上述任务。
System.setProperty("webdriver.gecko.driver", driverPath);
DesiredCapabilities capabilities = DesiredCapabilities.firefox();
capabilities.setCapability("marionette",true);
driver= new FirefoxDriver(capabilities);
@Test 方法
我们正在使用 Selenium web driver 提供的内置“get”方法导航到用户指定的 URL。以下语句有助于实现同样的目的。
driver.get("https://demo.guru99.com/selenium/guru99home/");
@After 方法
最后,我们使用 quit 方法关闭浏览器实例。
driver.quit();
修改非 Gecko 脚本为 Gecko 脚本
Selenium 3 之前使用的非 gecko 驱动程序脚本很简单。我们需要创建一个 Firefox 驱动程序实例并使用实例变量。
@Before
public void startBrowser() {
    driver = new FirefoxDriver();

}
要转换为 gecko,您只需添加一行代码
    @Before
    public void startBrowser() {
        System.setProperty("webdriver.gecko.driver", "D:\\Downloads\\GeckoDriver.exe");
        driver = new FirefoxDriver();

    }
使用 Gecko Driver 时常见的异常
以下是使用 Gecko Driver 时发生的常见异常列表及解决方案。
使用 Gecko Driver 的优点
Selenium Webdriver 版本 2.53 与 Mozilla Firefox 版本 47.0+ 不兼容。在早期版本的 Mozilla Firefox 中使用的 Firefox 驱动程序将被停用,并且将只使用 GeckoDriver 实现。因此,如果测试人员想在 Mozilla Firefox 47.0+ 版本上运行自动化测试,他们被迫使用 GeckoDriver。但是最大的问题是——有什么优势?
使用 GeckoDriver 而非默认 Firefox 驱动程序的主要优点是兼容性。GeckoDriver 使用 W3C WebDriver 协议 与 Selenium 通信。W3C 是 Web Driver 的通用标准。这意味着 Selenium 开发人员(编写 Selenium 基础代码的人)无需为每个浏览器版本创建新版本的 Web Driver。相同的 Web Driver 可用于多个浏览器版本。因此,GeckoDriver 比早期实现的 Firefox 驱动程序更受青睐。