Selenium Grid 教程:设置 Hub 和 Node(示例)
什么是 Selenium Grid?
Selenium Grid 是 Selenium Suite 的一部分,专门用于在不同的浏览器、操作系统和机器上并行运行多个测试。它通过将远程浏览器实例的命令路由到充当中心的服务器来实现。用户需要配置远程服务器才能执行测试。
Selenium Grid 有两个版本——旧版 Grid 1 和新版 Grid 2。我们将只关注 Grid 2,因为 Grid 1 正在被 Selenium 团队逐步淘汰。
Selenium Grid 架构
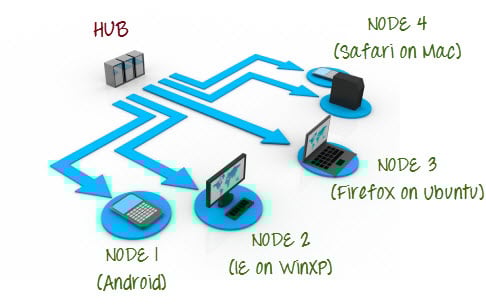
Selenium Grid 采用 Hub 和 Node 架构。
Hub
- Hub 是您加载测试的中心点。
- 一个 Grid 中只能有一个 Hub。
- Hub 只在一台机器上启动,例如,操作系统为 Windows 7,浏览器为 IE 的计算机。
- 包含 Hub 的机器是运行测试的地方,但您会在 Node 上看到浏览器正在自动化。
节点
- 节点是执行您在 Hub 上加载的测试的 Selenium 实例。
- 一个 Grid 中可以有一个或多个节点。
- 节点可以在具有不同平台和浏览器的多台机器上启动。
- 运行节点的机器不必与 Hub 的平台相同。
Selenium Grid 使用 Hub-Node 概念,您只需在称为Hub的单台机器上运行测试,但执行将由称为Node的不同机器完成。
如何设置 Selenium Grid?
在本节中,您将使用两台机器。第一台机器将是运行 Hub 的系统,而另一台机器将运行 Node。为简单起见,我们将运行 Hub 的机器称为“机器 A”,将运行 Node 的机器称为“机器 B”。记下它们的 IP 地址也很重要。假设机器 A 的 IP 地址是 192.168.1.3,而机器 B 的 IP 地址是 192.168.1.4。
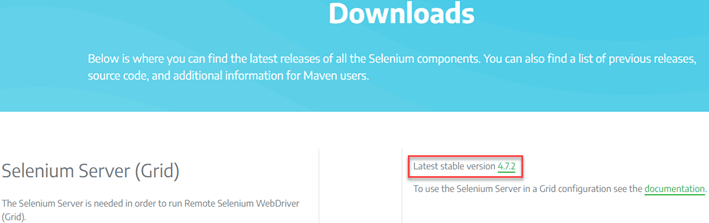
步骤 1) 从此处下载 Selenium Server。
步骤 2) 您可以将 Selenium Server .jar 文件放置在硬盘驱动器上的任何位置。但为了本教程的目的,请将其放置在机器 A 和机器 B 的 C 盘中。完成此操作后,您就完成了 Selenium Grid 的安装。以下步骤将启动 Hub 和 Node。
步骤 3)
- 我们现在将启动一个 Hub。转到机器 A。使用命令提示符,导航到机器 A 的 C 盘根目录,因为那是我们放置 Selenium Server 的目录。
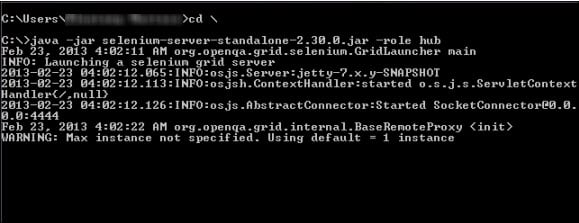
- 在命令提示符中,键入 java -jar selenium-server-standalone-2.30.0.jar -role hub
- Hub 应该成功启动。您的命令提示符应类似于下图。
步骤 4) 验证 Hub 是否正在运行的另一种方法是使用浏览器。Selenium Grid 默认使用机器 A 的端口 4444 作为其 Web 界面。只需打开浏览器并转到 https://:4444/grid/console
此外,您可以通过在机器 B 上启动浏览器并转到其中“iporhostnameofmachineA”应为 Hub 运行机器的 IP 地址或主机名来检查机器 B 是否可以访问 Hub 的 Web 界面。由于机器 A 的 IP 地址是 192.168.1.3,因此在机器 B 的浏览器中,您应该键入 http://192.168.1.3:4444/grid/console
步骤 5)
- 现在 Hub 已经设置好,我们将启动一个 Node。转到机器 B 并在那里启动一个命令提示符。
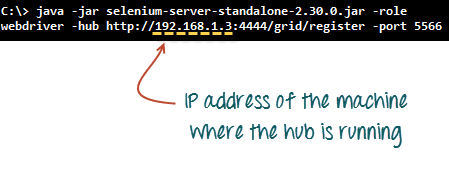
- 导航到 C 盘根目录并键入以下代码。我们使用 IP 地址 192.168.1.3,因为 Hub 在那里运行。我们还使用了端口 5566,尽管您可以选择任何您想要的空闲端口号。
- 注意:如果使用 Firefox,您现在必须提供 Gecko 驱动程序的路径。以下是需要使用的更新代码。
java -Dwebdriver.gecko.driver="C:\geckodriver.exe" -jar selenium-server-standalone-3.4.0.jar -role webdriver -hub http://192.168.1.3:4444/grid/register -port 5566
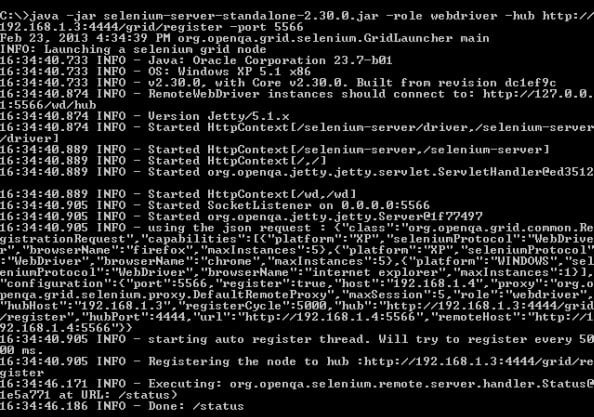
- 当您按 Enter 键时,您的命令提示符应类似于下图。
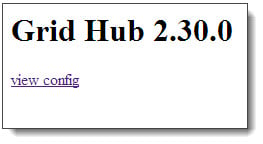
步骤 6) 转到 Selenium Grid Web 界面并刷新页面。您应该会看到类似这样的内容。
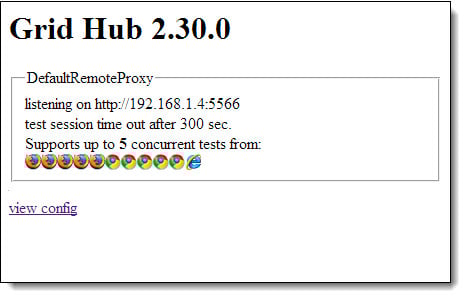
至此,您已经配置了一个简单的 Grid。您现在可以在机器 B 上远程运行测试了。
何时使用 Selenium Grid?
当您想要执行以下一项或两项操作时,应该使用 Selenium Grid
- 同时在不同的浏览器、操作系统和机器上运行测试。 这将确保您正在测试的应用程序与各种浏览器-操作系统组合完全兼容。
- 节省测试套件的执行时间。如果您将 Selenium Grid 设置为一次运行 4 个测试,那么您将能够以大约 4 倍的速度完成整个套件。
Grid 1.0 与 Grid 2.0
以下是 Selenium Grid 1 和 2 之间的主要区别。
| Grid 1 | Grid 2 |
|---|---|
| Selenium Grid 1 有自己的远程控制,它与 Selenium RC 服务器不同。它们是两个不同的程序。 | Selenium Grid 2 现在与 Selenium Server jar 文件捆绑在一起。 |
| 在使用 Grid 1 之前,您需要先安装和配置Apache Ant。 | 在 Grid 2 中不需要安装 Apache Ant。 |
| 只能支持 Selenium RC 命令/脚本。 | 可以支持 Selenium RC 和 WebDriver 脚本。 |
| 每个远程控制只能自动化一个浏览器。 | 一个远程控制可以自动化多达 5 个浏览器。 |
Selenium Grid 可以通过两种不同的方式设置;一种通过命令行,另一种通过 JSON 配置文件。
设计可在 Grid 上运行的测试脚本
要设计将在 Grid 上运行的测试脚本,我们需要使用 DesiredCapabilites 和 RemoteWebDriver 对象。
- DesiredCapabilites 用于设置我们将自动化的浏览器类型和操作系统。
- RemoteWebDriver 用于设置我们的测试将针对哪个节点(或机器)运行。
要使用 DesiredCapabilites 对象,您必须首先导入此包
![]()
要使用 RemoteWebDriver 对象,您必须导入这些包。
![]()
使用 DesiredCapabilites 对象
转到 Grid 的 Web 界面,并将鼠标悬停在您想要自动化的浏览器图像上。记下工具提示显示的平台和浏览器名称。
.png)
在这种情况下,平台是“XP”,浏览器名称是“Firefox”。
我们将在 WebDriver 中使用平台和浏览器名称,如下所示(当然您需要先导入必要的包)。
![]()
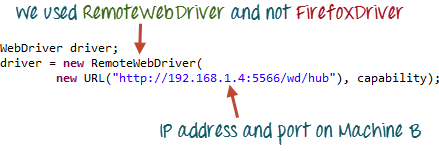
使用 RemoteWebDriver 对象
导入 RemoteWebDriver 的必要包,然后将我们上面创建的 DesiredCapabilities 对象作为参数传递给 RemoteWebDriver 对象。
在 Grid 上运行一个示例测试用例
下面是一个简单的 WebDriver Testng 代码,您可以在机器 A 的 Eclipse 中创建。一旦运行,自动化将在机器 B 上执行。
import org.openqa.selenium.*;
import org.openqa.selenium.remote.DesiredCapabilities;
import java.net.MalformedURLException;
import java.net.URL;
import org.openqa.selenium.remote.RemoteWebDriver;
import org.testng.Assert;
import org.testng.annotations.*;

public class Grid_2 {
 WebDriver driver;
 String baseUrl, nodeURL;
 @BeforeTest
 public void setUpWthrows MalformedURLException {
 baseUrl = "http://newtours.demoaut.com/";
 nodeURL = "http://192.168.1.4:5566/wd/hub";
 DesiredCapabilities capability = DesiredCapabilities.firefox();
 capability. setBrowserName("firefox");
 capability. setPlatform(Platform.XP);
 driver = new RemoteWebDriver(new URL(nodeURL), capability);
}
@AfterTest
public void afterTest() {
 driver.quit();
 }
@Test
public void simpleTest() {
driver.get(baseUr1);
 Assert.assertEquas("Welcome: Mercury Tours", driver.getTitle()); }
}
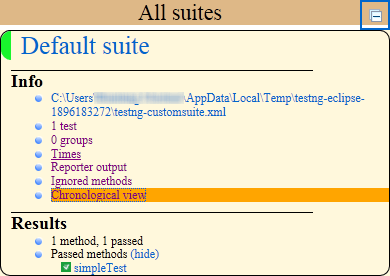
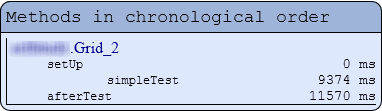
测试应该通过。
 |
 |
使用 JSON 文件配置 Selenium Grid
JSON 代表 Javascript 对象表示法。它是一种用于浏览器和 Web 服务器之间交换数据的标准格式。Selenium 具有内置的 JSON 配置文件,可用于设置 Selenium Grid。
以下是使用 JSON 配置文件配置 Selenium Grid 的步骤。
步骤 1) 使用以下路径下载 JSON 配置文件代码
这是代码
{
	  "port": 4444,
	  "newSessionWaitTimeout": -1,
	  "servlets" : [],
	  "withoutServlets": [],
	  "custom": {},
	  "capabilityMatcher": "org.openqa.grid.internal.utils.DefaultCapabilityMatcher",
	  "registryClass": "org.openqa.grid.internal.DefaultGridRegistry",
	  "throwOnCapabilityNotPresent": true,
	  "cleanUpCycle": 5000,
	  "role": "hub",
	  "debug": false,
	  "browserTimeout": 0,
	  "timeout": 1800
}
步骤 2) 将代码复制并粘贴到文本编辑器(如记事本)中,并将其扩展名为“.json”
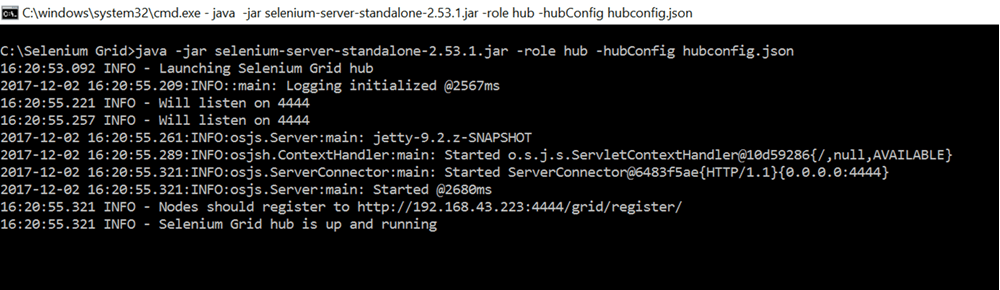
步骤 3) 使用命令行启动 Hub,命令如下
java -jar selenium-server-standalone-2.53.1.jar -role hub -hubConfig hubconfig.json
注意: Selenium 独立 jar 文件和 json 文件必须位于同一目录下。
步骤 4) 将出现以下屏幕,表明 Hub 已成功设置。
步骤 5) 打开网络浏览器并尝试连接到以下 URL
http://192.168.43.223:4444/grid/console
注意: URL 可能因机器而异。必须使用上述屏幕上“Nodes should register to”后面的 URL。
步骤 6) 将出现 Grid Console 屏幕,表明 Hub 已启动并正在运行。

使用 JSON 配置 NODES
步骤 1) 使用以下 URL 下载 Selenium 提供的示例节点配置文件
注意: 如果您使用的是 SELENIUM 3.0 或更高版本,则必须使用以下 JSON 文件
步骤 2) 将代码复制并粘贴到文本编辑器(如记事本)中,并将其扩展名为“.json”
步骤 3)
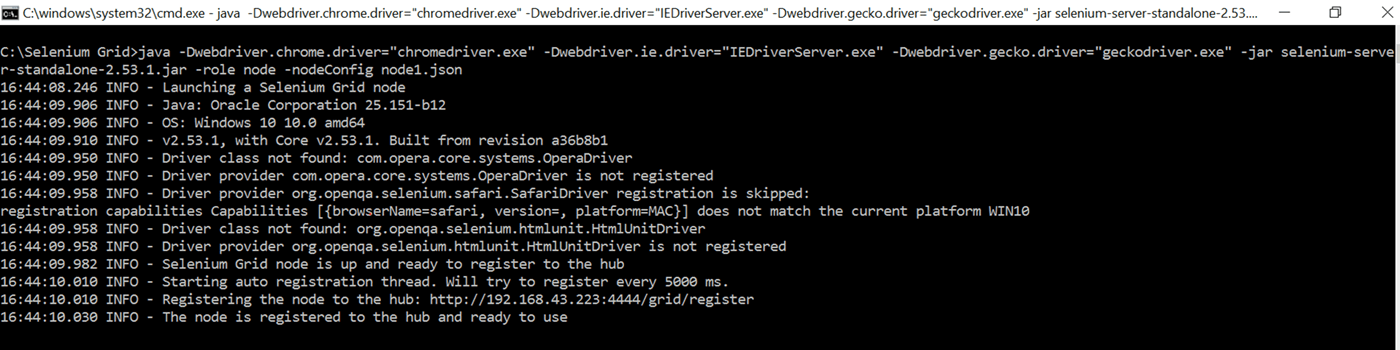
在命令提示符下运行以下命令
Java-Dwebdriver.chrome.driver="chromedriver.exe" -Dwebdriver.ie.driver="IEDriverServer.exe" -Dwebdriver.gecko.driver="geckodriver.exe" -jar selenium-server-standalone-2.53.1.jar -role node -nodeConfig node1.json
注意:在运行命令之前,请确保已将每个浏览器的驱动程序下载到本地机器目录中。
步骤 4) 按下回车键后将出现以下屏幕
步骤 5) 导航到 Grid 控制台以验证节点是否已成功配置。
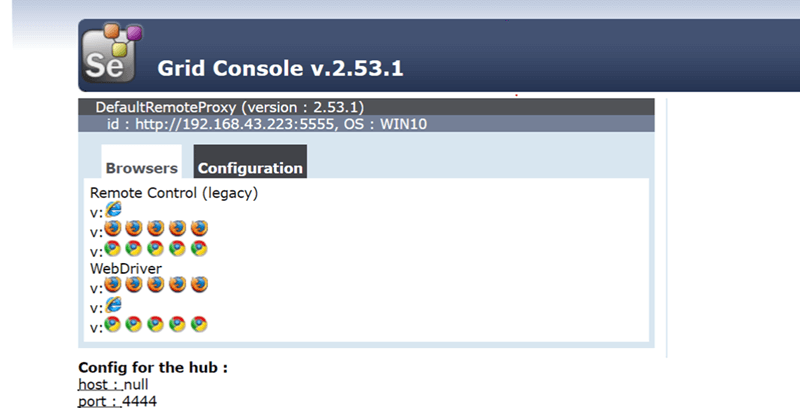
浏览器显示在 Grid 控制台上。因此我们可以确定节点已成功配置。
Selenium Grid 上的示例测试用例
 package com.objectrepository.demo;
 import org.openqa.selenium.*;
 import org.openqa.selenium.remote.DesiredCapabilities;
 import java.net.MalformedURLException;
 import java.net.URL;
 import org.openqa.selenium.remote.RemoteWebDriver;
 import org.testng.Assert;
 import org.testng.annotations.*;

 public class SeleniumGrid {

     WebDriver driver;
     String baseURL, nodeURL;

     @BeforeTest
     public void setUp() throws MalformedURLException {
         baseURL = "https://demo.guru99.com/test/guru99home/";
         nodeURL = "http://192.168.43.223:5566/wd/hub";
         DesiredCapabilities capability = DesiredCapabilities.chrome();
         capability.setBrowserName("chrome");
         capability.setPlatform(Platform.WIN10);
         driver = new RemoteWebDriver(new URL(nodeURL), capability);
     }

     @AfterTest
     public void afterTest() {
         driver.quit();
     }
     @Test
     public void sampleTest() {
         driver.get(baseURL);


         if (driver.getPageSource().contains("MOBILE TESTING")) {
             Assert.assertTrue(true, "Mobile Testing Link Found");
         } else {
             Assert.assertTrue(false, "Failed: Link not found");
         }

     }

 }
上述代码启动 Chrome 浏览器并导航到“baseURL”变量中指定的 URL。它验证页面上是否显示名为“Mobile Testing”的链接。
“nodeURL”变量中的 URL 可以修改以反映远程机器的 IP 地址。测试结果可以在生成的默认 TestNG 报告中验证。
摘要
- Selenium Grid 用于在不同浏览器和平台上同时运行多个测试。
- Grid 使用 Hub-Node 概念。
- Hub 是您加载测试的中心点。
- 节点是执行您在 Hub 上加载的测试的 Selenium 实例。
- 要安装 Selenium Grid,您只需下载 Selenium Server jar 文件——与运行 Selenium RC 测试相同的文件。
- 有两种方法可以验证 Hub 是否正在运行:一种通过命令提示符,另一种通过浏览器。
- 要在 Grid 上运行测试脚本,您应该使用 DesiredCapabilities 和 RemoteWebDriver 对象。
- DesiredCapabilites 用于设置我们将自动化的浏览器类型和操作系统。
- RemoteWebDriver 用于设置我们的测试将针对哪个节点(或机器)运行。