Selenium Webdriver Java 程序示例
Selenium Java 示例
使用我们在上一个教程中创建的 Java 类“myclass”,让我们尝试创建一个 WebDriver 脚本,它将
步骤 1: 获取 Mercury Tours 的主页
步骤 2: 验证其标题
步骤 3: 打印比较结果
步骤 4: 在整个程序结束前关闭它。
Selenium WebDriver 示例代码
以下是上述场景逻辑的实际 WebDriver 代码
package newproject;
import org.openqa.selenium.WebDriver;
import org.openqa.selenium.firefox.FirefoxDriver;
//comment the above line and uncomment below line to use Chrome
//import org.openqa.selenium.chrome.ChromeDriver;
public class PG1 {


    public static void main(String[] args) {
        // declaration and instantiation of objects/variables
    	System.setProperty("webdriver.gecko.driver","C:\\geckodriver.exe");
		WebDriver driver = new FirefoxDriver();
		//comment the above 2 lines and uncomment below 2 lines to use Chrome
		//System.setProperty("webdriver.chrome.driver","G:\\chromedriver.exe");
		//WebDriver driver = new ChromeDriver();

        String baseUrl = "https://demo.guru99.com/test/newtours/";
        String expectedTitle = "Welcome: Mercury Tours";
        String actualTitle = "";

        // launch Fire fox and direct it to the Base URL
        driver.get(baseUrl);

        // get the actual value of the title
        actualTitle = driver.getTitle();

        /*
         * compare the actual title of the page with the expected one and print
         * the result as "Passed" or "Failed"
         */
        if (actualTitle.contentEquals(expectedTitle)){
            System.out.println("Test Passed!");
        } else {
            System.out.println("Test Failed");
        }

        //close Fire fox
        driver.close();
    }

}
注意:从 Firefox 35 开始,您需要使用 Mozilla 创建的 gecko 驱动程序才能使用 Web Driver。Selenium 3.0、gecko 和 Firefox 存在兼容性问题,正确设置它们可能是一项艰巨的任务。如果代码不起作用,请降级到 Firefox 47 或更低版本。或者,您可以在 Chrome 上运行脚本。Selenium 对 Chrome 开箱即用。您只需更改 3 行代码即可使您的脚本在 Chrome 或 Firefox 上运行
代码解释
导入包
首先,您需要导入以下两个包
- org.openqa.selenium.* – 包含实例化新浏览器(加载特定驱动程序)所需的 WebDriver 类
- org.openqa.selenium.firefox.FirefoxDriver – 包含实例化 Firefox 特定驱动程序到由 WebDriver 类实例化的浏览器所需的 FirefoxDriver 类
如果您的测试需要更复杂的操作,例如访问另一个类、截取浏览器屏幕截图或操作外部文件,那么您肯定需要导入更多包。
实例化对象和变量
通常,驱动程序对象的实例化方式如下。
WebDriver driver = new FirefoxDriver();
不带参数的 FirefoxDriver 类意味着我们的 Java 程序将启动默认的 Firefox 配置文件。默认的 Firefox 配置文件类似于在安全模式下启动 Firefox(不加载任何扩展)。
为方便起见,我们将基本 URL 和预期标题保存为变量。
启动浏览器会话
WebDriver 的 get() 方法用于启动新的浏览器会话并将其定向到您指定为参数的 URL。
driver.get(baseUrl);
获取实际页面标题
WebDriver 类具有 getTitle() 方法,该方法始终用于获取当前加载页面的页面标题。
actualTitle = driver.getTitle();
比较预期值和实际值
这部分代码只是使用基本的 Java if-else 结构来比较实际标题与预期标题。
if (actualTitle.contentEquals(expectedTitle)){
            System.out.println("Test Passed!");
        } else {
            System.out.println("Test Failed");
        }
终止浏览器会话
“close()”方法用于关闭浏览器窗口。
driver.close();
终止整个程序
如果您在不先关闭所有浏览器窗口的情况下使用此命令,您的整个 Java 程序将结束,但浏览器窗口仍将打开。
System.exit(0);
运行测试
在 Eclipse IDE 中有两种执行代码的方法。
- 在 Eclipse 的菜单栏上,单击 Run > Run。
- 按 Ctrl+F11 运行整个代码。
.png)
如果一切正确,Eclipse 将输出“Test Passed!”
.png)
定位 GUI 元素
在 WebDriver 中定位元素是通过使用“findElement(By.locator())”方法完成的。代码的“locator”部分与这些教程的 Selenium IDE 章中先前讨论的任何定位器相同。事实上,建议您使用 IDE 定位 GUI 元素,一旦成功识别,就将代码导出到 WebDriver。
这是一个通过 id 定位元素的 Selenium 示例代码。Facebook 用作基本 URL。
package newproject;
import org.openqa.selenium.By;
import org.openqa.selenium.WebDriver;
import org.openqa.selenium.firefox.FirefoxDriver;

public class PG2 {
    public static void main(String[] args) {
    	System.setProperty("webdriver.gecko.driver","C:\\geckodriver.exe");
    	WebDriver driver = new FirefoxDriver();
        String baseUrl = "https://#";
        String tagName = "";

        driver.get(baseUrl);
        tagName = driver.findElement(By.id("email")).getTagName();
        System.out.println(tagName);
        driver.close();
        System.exit(0);
}
}
我们使用 getTagName() 方法提取了 id 为“email”的特定元素的标签名。运行时,此代码应该能够正确识别标签名“input”并将其打印到 Eclipse 的控制台窗口中。
.png)
定位元素总结
| 变体 | 描述 | 示例 |
|---|---|---|
| By.className | 根据“class”属性的值查找元素 | findElement(By.className(“someClassName”)) |
| By.cssSelector | 根据驱动程序的底层 CSS 选择器引擎查找元素 | findElement(By.cssSelector(“input#email”)) |
| By.id | 通过“id”属性的值定位元素 |
findElement(By.id(“someId”)) |
| By.linkText | 通过显示的准确文本查找链接元素 |
findElement(By.linkText(“REGISTRATION”)) |
| By.name | 通过“name”属性的值定位元素 |
findElement(By.name(“someName”)) |
| By.partialLinkText | 定位包含给定链接文本的元素 |
findElement(By.partialLinkText(“REG”)) |
| By.tagName | 通过标签名定位元素 |
findElement(By.tagName(“div”)) |
| By.xpath | 通过 XPath 定位元素 |
findElement(By.xpath(“//html/body/div/table/tbody/tr/td[2]/table/ tbody/tr[4]/td/table/tbody/tr/td[2]/table/tbody/tr[2]/td[3]/ form/table/tbody/tr[5]”)) |
关于使用 findElement(By.cssSelector()) 的注意事项
By.cssSelector() 不支持“contains”功能。请看下面的 Selenium IDE 代码 –
.png)
在上面的 Selenium IDE 中,整个测试都通过了。然而,在下面的 Selenium WebDriver 脚本中,相同的测试产生了错误,因为 WebDriver 在 By.cssSelector() 方法中不支持“contains”关键字。
.png)
常用命令
实例化 Web 元素
与其每次访问特定元素时都使用冗长的“driver.findElement(By.locator())”语法,我们可以为其实例化一个 WebElement 对象。WebElement 类包含在“org.openqa.selenium.*”包中。
.png)
单击元素
单击可能是与网页元素交互最常见的方式。click() 方法用于模拟点击任何元素。以下 Selenium Java 示例展示了如何使用 click() 点击 Mercury Tours 的“Sign-In”按钮。
![]()
使用 click() 方法时必须注意以下几点。
- 它不接受任何参数。
- 如果适用,该方法会自动等待新页面加载。
- 要点击的元素必须可见(高度和宽度不能等于零)。
Get 命令
Get 命令获取有关页面/元素的各种重要信息。以下是一些您必须熟悉的“get”重要命令。
| 命令 | 用途 |
|---|---|
| get()
示例用法 |
|
| getTitle()
示例用法 |
|
| getPageSource()
示例用法 |
|
| getCurrentUrl()
示例用法 |
|
| getText()
示例用法 |
|
Navigate 命令
这些命令允许您刷新、进入和在不同网页之间来回切换。
| navigate().to()
示例用法 |
|
| navigate().refresh()
示例用法 |
|
| navigate().back()
示例用法 |
|
| navigate().forward()
示例用法 |
|
关闭和退出浏览器窗口
| close()
示例用法 |
|
| quit()
示例用法 |
|
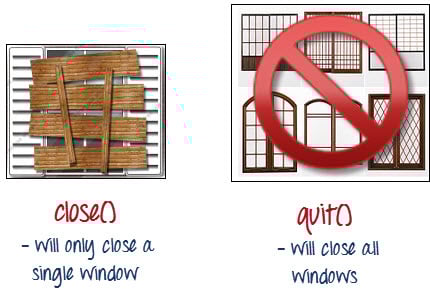
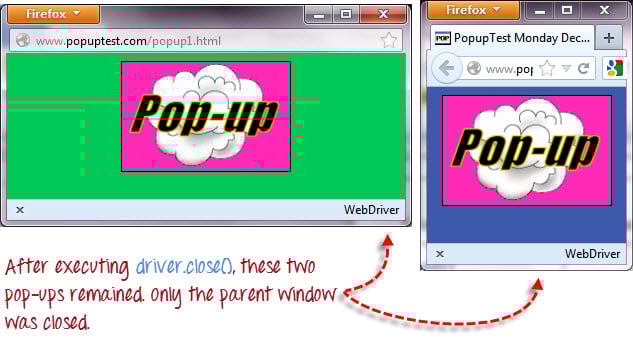
为了清楚地说明 close() 和 quit() 之间的区别,请尝试执行以下代码。它使用一个网页,该网页会在页面加载时自动弹出窗口,并在退出后打开另一个窗口。
.png)
请注意,只关闭了父浏览器窗口,而不是两个弹出窗口。
但是,如果您使用 quit(),所有窗口都将被关闭——不仅仅是父窗口。尝试运行下面的代码,您会注意到上面的两个弹出窗口也将自动关闭。
package newproject;
import org.openqa.selenium.WebDriver;
import org.openqa.selenium.firefox.FirefoxDriver;

public class PG3 {
    public static void main(String[] args) {
    	System.setProperty("webdriver.gecko.driver","C:\\geckodriver.exe");
    	WebDriver driver = new FirefoxDriver();
        driver.get("http://www.popuptest.com/popuptest2.html");
        driver.quit();  // using QUIT all windows will close
    }
}
在框架之间切换
要访问框架中的 GUI 元素,我们应该首先指示 WebDriver 将焦点放在框架或弹出窗口上,然后才能访问其中的元素。例如,我们以网页 https://demo.guru99.com/selenium/deprecated.html 为例
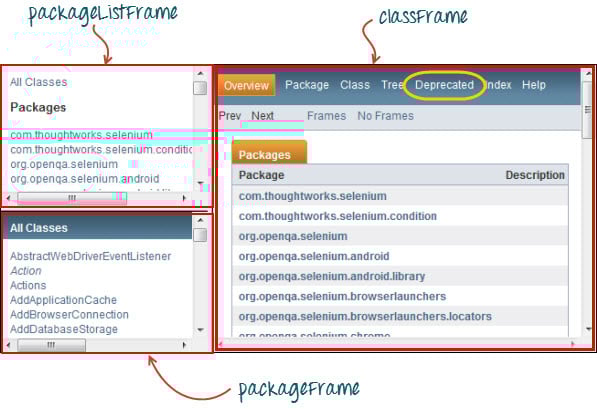
此页面有 3 个框架,其“name”属性如上所示。我们希望访问上面黄色圈出的“Deprecated”链接。为此,我们必须首先指示 WebDriver 使用 “switchTo().frame()” 方法切换到“classFrame”框架。我们将使用框架的名称属性作为“frame()”部分的参数。
package newproject;
import org.openqa.selenium.By;
import org.openqa.selenium.WebDriver;
import org.openqa.selenium.firefox.FirefoxDriver;
public class PG4 {
	  public static void main(String[] args) {
		  	System.setProperty("webdriver.gecko.driver","C:\\geckodriver.exe");
		  	WebDriver driver = new FirefoxDriver();
	        driver.get("https://demo.guru99.com/selenium/deprecated.html");
	        driver.switchTo().frame("classFrame");
	        driver.findElement(By.linkText("Deprecated")).click();
	        driver.close();
	    }
}
执行此代码后,您将看到“classFrame”框架被带到“Deprecated API”页面,这意味着我们的代码成功访问了“Deprecated”链接。
在弹出窗口之间切换
与 Selenium IDE 不同,WebDriver 允许显示弹出窗口(如警报)。要访问警报中的元素(例如它包含的消息),我们必须使用 "switchTo().alert()" 方法。在下面的代码中,我们将使用此方法访问警报框,然后使用 "getText()" 方法检索其消息,然后使用 "switchTo().alert().accept()" 方法自动关闭警报框。
首先,访问 https://output.jsbin.com/usidix/1 并手动点击那里的“Go!”按钮,亲自查看消息文本。
.png)
让我们看看 Selenium 示例代码如何做到这一点——
package mypackage;

import org.openqa.selenium.By;
import org.openqa.selenium.WebDriver;
import org.openqa.selenium.firefox.FirefoxDriver;

public class myclass {

    public static void main(String[] args) {
    	System.setProperty("webdriver.gecko.driver","C:\\geckodriver.exe");
        WebDriver driver = new FirefoxDriver();
        String alertMessage = "";

        driver.get("http://jsbin.com/usidix/1");
        driver.findElement(By.cssSelector("input[value=\"Go!\"]")).click();
        alertMessage = driver.switchTo().alert().getText();
        driver.switchTo().alert().accept();

        System.out.println(alertMessage);
        driver.quit();

    }
}
在 Eclipse 控制台中,请注意打印的警报消息是
.png)
等待
等待有两种。
- 隐式等待 – 用于在整个程序中设置默认等待时间
- 显式等待 – 仅用于为特定实例设置等待时间
隐式等待
- 它比显式等待更容易编码。
- 它通常在代码的实例化部分声明。
- 您只需要导入一个额外的包。
要开始使用隐式等待,您必须将此包导入到您的代码中。
![]()
然后在代码的实例化部分添加此内容。
.png)
显式等待
显式等待通过 WebDriverWait 和 ExpectedCondition 类完成。对于以下 Selenium WebDriver 示例,我们将最多等待 10 秒,直到 id 为“username”的元素可见,然后才执行下一个命令。以下是步骤。
步骤 1
导入这两个包
![]()
步骤 2
声明一个 WebDriverWait 变量。在此示例中,我们将使用“myWaitVar”作为变量名。
.png)
步骤 3
在需要显式等待发生的部分,将 myWaitVar 与 ExpectedConditions 一起使用。在这种情况下,我们将在“username”(Mercury Tours 主页)输入上使用显式等待,然后才在其中键入文本“tutorial”。
![]()
条件
以下方法用于条件和循环操作——
- isEnabled() 用于在执行命令之前验证某个元素是否已启用。
.png)
- isDisplayed() 用于在执行命令之前验证某个元素是否已显示。
.png)
- isSelected() 用于验证某个复选框、单选按钮或下拉框中的选项是否已选中。它不适用于其他元素。

使用 ExpectedConditions
ExpectedConditions 类提供了更广泛的条件集,您可以将其与 WebDriverWait 的 until() 方法结合使用。
以下是一些最常见的 ExpectedConditions 方法。
- alertIsPresent() – 等待直到显示警报框。
.png)
- elementToBeClickable() – 等待直到元素可见并同时启用。下面的 Selenium 示例代码将等待直到 id=”username”的元素可见并启用,然后才将该元素分配为名为“txtUserName”的 WebElement 变量。
![]()
- frameToBeAvailableAndSwitchToIt() – 等待直到给定框架可用,然后自动切换到它。
.png)
捕获异常
使用 isEnabled()、isDisplayed() 和 isSelected() 时,WebDriver 假定元素已存在于页面上。否则,它将抛出 NoSuchElementException。为避免这种情况,我们应该使用 try-catch 块,以免程序中断。
WebElement txtbox_username = driver.findElement(By.id("username"));
try{
        if(txtbox_username.isEnabled()){
            txtbox_username.sendKeys("tutorial");
        }
    }

catch(NoSuchElementException nsee){
            System.out.println(nsee.toString());
 }
如果您使用显式等待,您应该捕获的异常类型是“TimeoutException”。
.png)
摘要
- 要开始使用 WebDriver API,您必须至少导入这两个包。
- org.openqa.selenium.*
- org.openqa.selenium.firefox.FirefoxDriver
get()方法等同于 Selenium IDE 的“open”命令。- 在 WebDriver 中定位元素是通过使用
findElement()方法完成的。 - 以下是 WebDriver 中定位元素的可用选项
- By.className
- By.cssSelector
- By.id
- By.linkText
- By.name
- By.partialLinkText
- By.tagName
- By.xpath
- By.cssSelector() 不支持 “contains” 功能。
- 您可以使用 WebElement 类实例化元素。
- 单击元素是通过使用
click()方法完成的。 - WebDriver 提供了这些有用的 get 命令
- get()
- getTitle()
- getPageSource()
- getCurrentUrl()
- getText()
- WebDriver 提供了这些有用的导航命令
- navigate().forward()
- navigate().back()
- navigate().to()
- navigate().refresh()
- close() 和 quit() 方法用于关闭浏览器窗口。
Close()用于关闭单个窗口;而quit()用于关闭与 WebDriver 对象控制的父窗口关联的所有窗口。 switchTo().frame()和switchTo().alert()方法分别用于将 WebDriver 的焦点定向到框架或警报。隐式等待用于设置整个程序的等待时间,而显式等待仅用于特定部分。- 在验证元素状态时,可以使用 isEnabled()、isDisplayed()、isSelected() 以及 WebDriverWait 和 ExpectedConditions 方法的组合。但是,它们不会验证元素是否不存在。
- 当调用 isEnabled()、isDisplayed() 或 isSelected() 而元素不存在时,WebDriver 将抛出 NoSuchElementException。
- 当调用 WebDriverWait 和 ExpectedConditions 方法而元素不存在时,WebDriver 将抛出
TimeoutException。
注意
driver.get(): 此方法用于导航到特定网站。但是,它不维护浏览器历史记录或 Cookie。因此,前进和后退按钮将不起作用,单击它们将不会安排页面导航。
driver.navigate(): 此方法也用于导航到特定网站,但它维护浏览器历史记录和 Cookie。这允许在编写测试用例时使用前进和后退按钮在页面之间导航。